Record Keeping Made Easy: A DIY Method Using Google Forms and Sheets

By Billy Sveen

Billy Sveen is a herpetoculturalist, physician, and bioethicist living in Minneapolis, Minnesota. Follow him on Instagram at @creepersherpetoculture

As a reptile and amphibian enthusiast, maintaining accurate records of your captive population is important to monitoring health and tracking significant events, whether you keep a single animal or operate large breeding groups. However, organizing data efficiently can be a daunting task. Fortunately, technology can help. In this blog post, I’ll explore a streamlined and customizable DIY method of data entry using Google Forms on your phone and collecting the results in Google Sheets, perfect for herpetoculturalists looking to maintain accurate records of their collections. It’s also free to use for anyone with a Google account and a smartphone. I’ll be showing the basic steps, but YouTube guides are readily available for any details on how to use specific features of Forms or Sheets.

1. Creating Google Forms for Data Entry

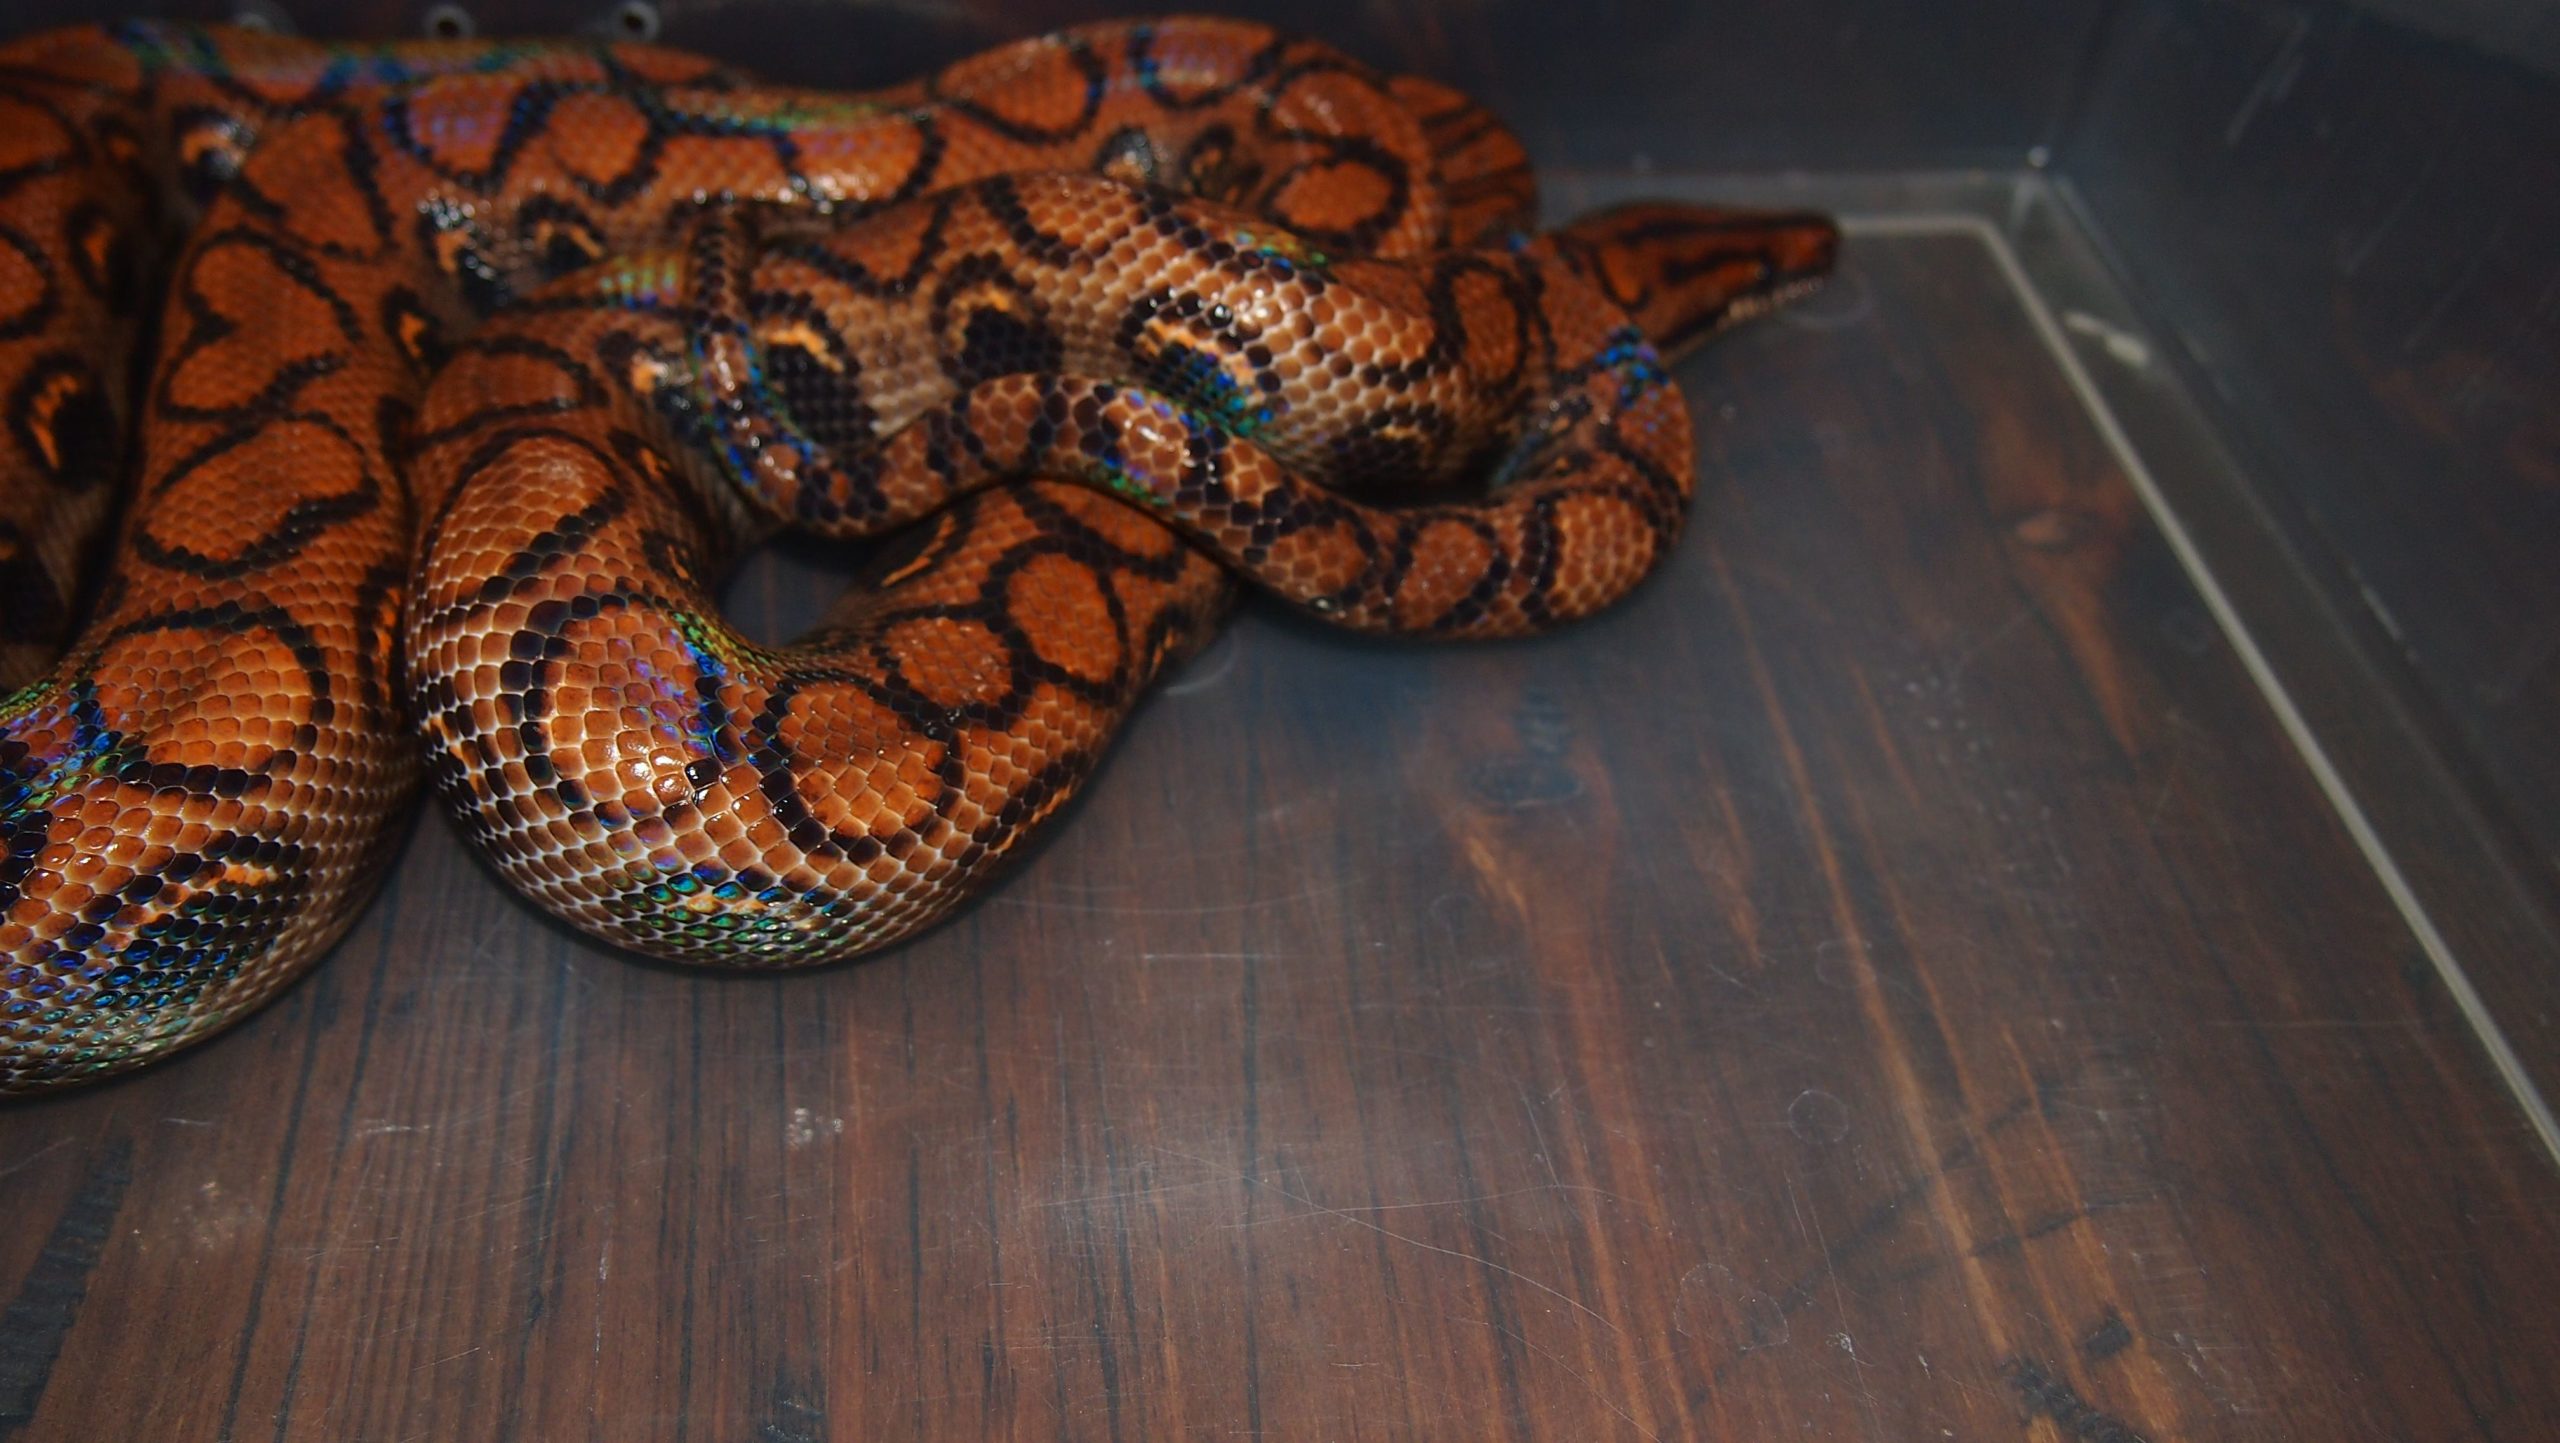
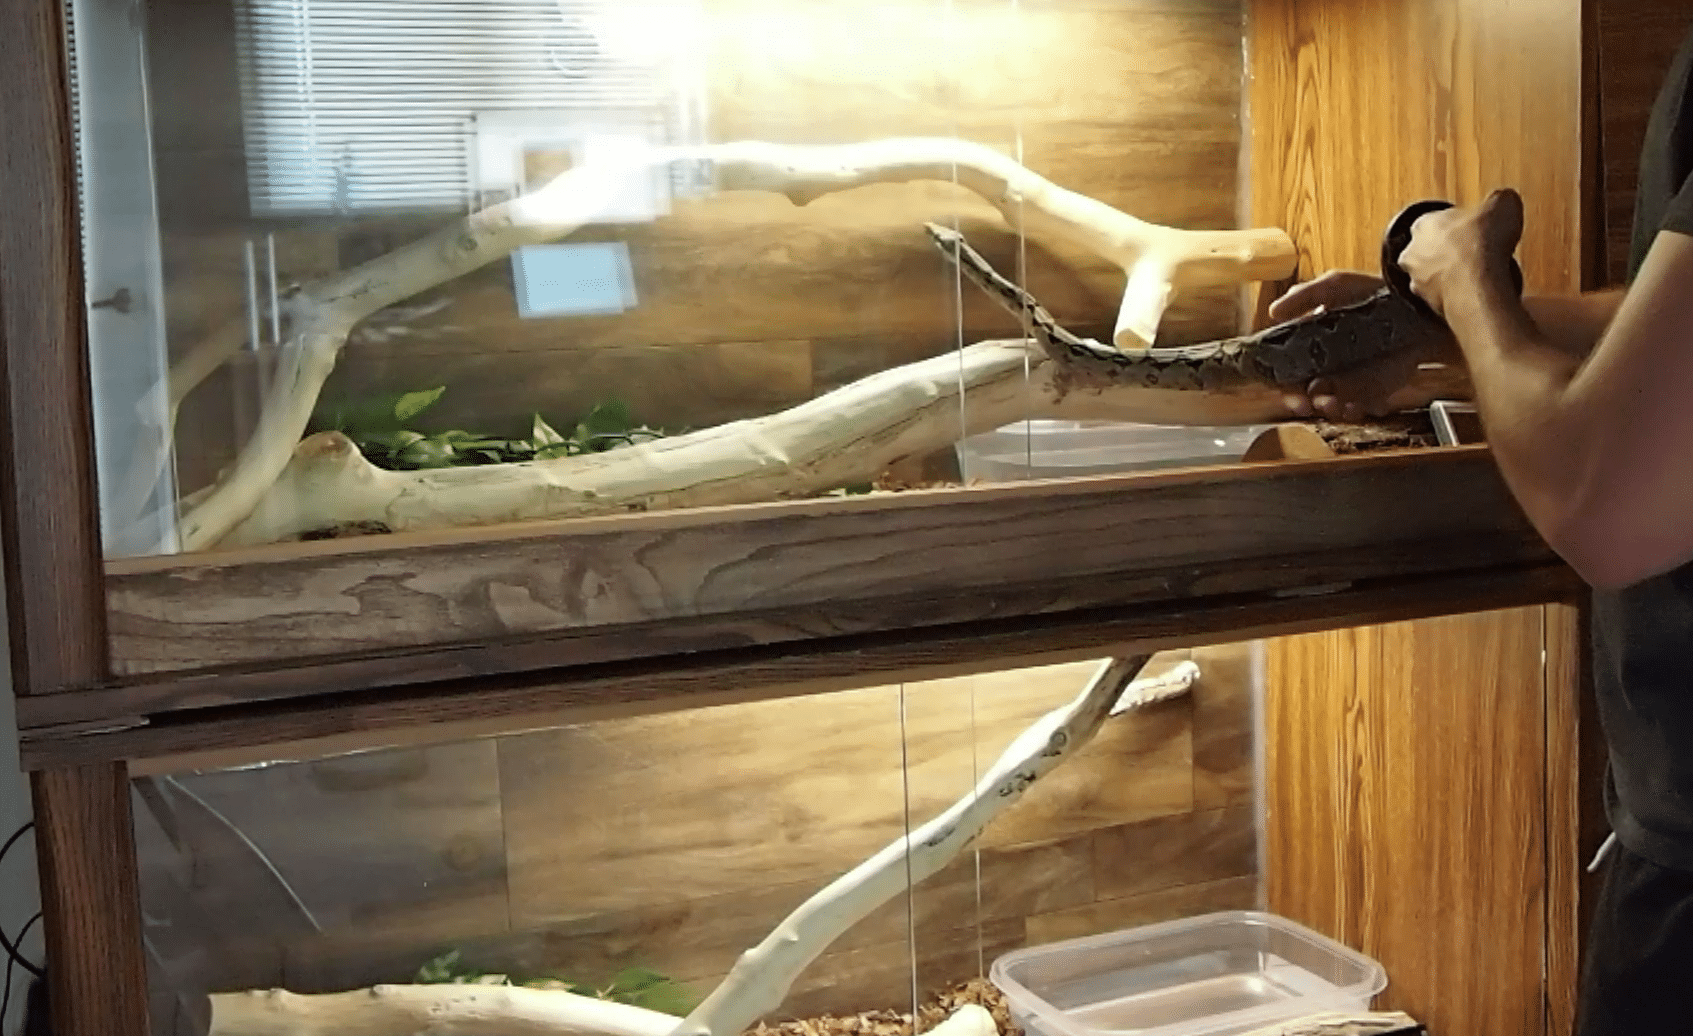
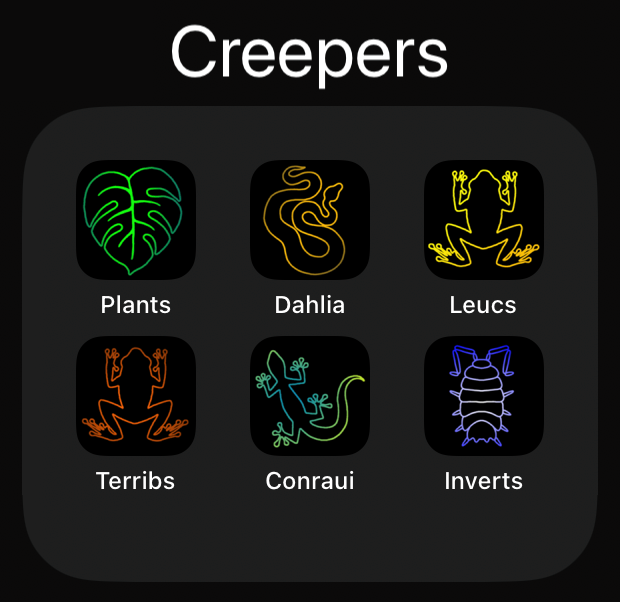
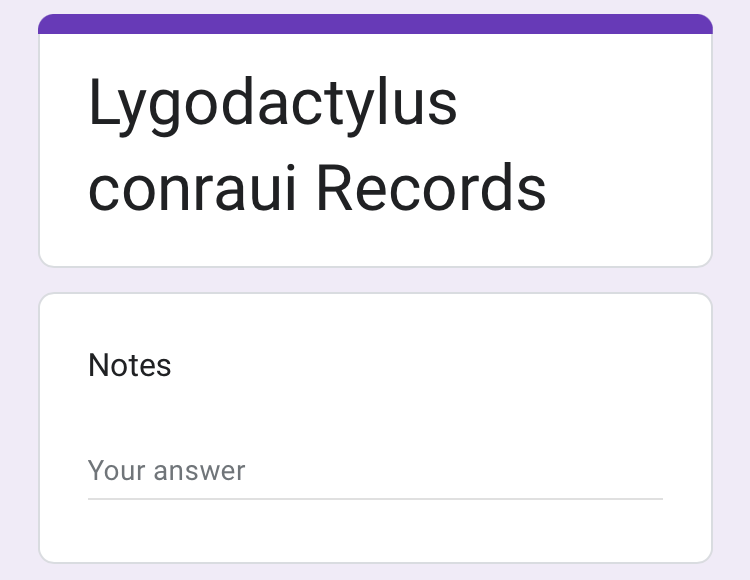
The first step is to create Google Forms tailored to your specific needs. These forms can be as simple or as complex as you want and are easy to modify at any time. You can add multiple choice, drop-down selections, and free text as needed. For example, the form for my ball/royal python (Python regius) Dahlia includes sections many pet keepers may want on feeding, weights, shedding, stooling, and any other enclosure notes where I record changes in temperature, lighting, and humidity. By contrast, the form for my Cameroon dwarf geckos (Lygodactylus conraui) is much simpler with only a section to take general notes as I don’t track their regular feedings and don’t weigh them. One benefit of using Forms is that the date and time of each entry will be automatically recorded, so you won’t need to track that specifically if you use them in real-time, but I always have at least one option for free text notes where I can note a late entry.

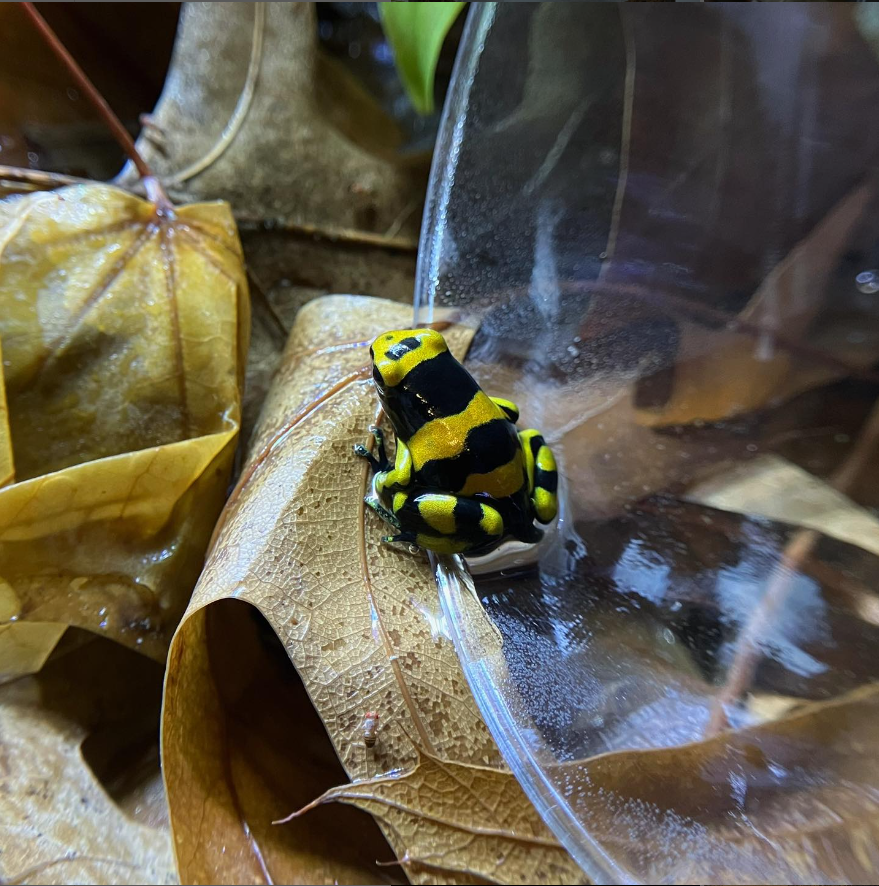
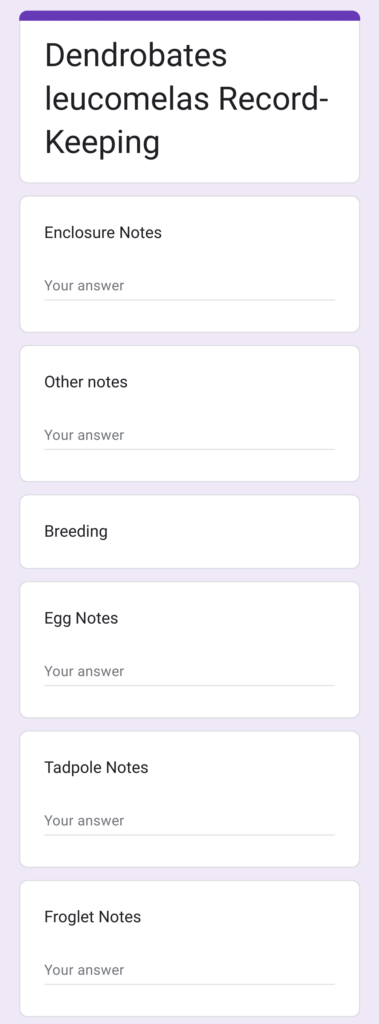
The form for my yellow-banded poison dart frogs (Dendrobates leucomelas) was similarly simple until they started breeding. Once they started reproducing, I easily added sections to track eggs, tadpoles, and froglets. Initially, I added separate areas for the number of total eggs, the number of infertile eggs, the hatching of individual tadpoles, etc., but I quickly found this too cumbersome, so I easily streamlined the form a few weeks later.

The possibilities here are endless. I have one form to broadly track my invertebrate feeder colonies and another to detail every plant I obtain, where I obtain it, how I quarantine it, etc. A pet keeper with an elaborate enclosure or two may want much more detailed notes while a professional breeder may want a physical card system to track feeding breeders and hatchlings but may want forms to track pairings and incubation data.

2. Accessing Forms via Smartphone Shortcuts

Once you set up a form, the next step is to make data entry quick and convenient. I suggest creating shortcuts on your smartphone for each form. This allows you to access the forms immediately while tending to your animals. Recording information promptly minimizes the chance of forgetting crucial details.

The first step is to get the URL for the form. When viewing the form, click the “Send” button and either copy the link or email it to yourself. Next, open the website in a browser on your phone and add it to your home screen as a website shortcut. Android users will be able to customize the icon in this process, but iPhone users will have to use a slightly more involved Shortcuts app to make custom icons instead of having the default icon associated with the Google Forms website. Once you make the shortcuts, you can group them together in one folder or hide them all together and search for them as needed.

For those working alone, shortcuts on your smartphone can be sufficient. However, if you have others assisting with your collection, you can take it a step further by generating QR codes for each form’s link. Placing these QR codes on the enclosures makes data entry accessible for an entire team without having to enter the shortcuts into their phones.

3. Linking Data to Google Sheets

The real power comes from linking all the data collected from the forms to Google Sheets. To do this, first access a form from which you want to import data. Then click on the “Responses” tab at the top of the page. Next, click “Link to Sheets” where you can create a new spreadsheet or link it to an existing spreadsheet. Repeat this with all of your forms.

If you have a small to medium-sized population of animals like me, you’ll probably like to have all your data as separate sheets within the same file. For example, I’ve titled my file “Creepers Herpetoculture Records” and then have separate sheets for each of my forms. If you have a large or commercial operation, you may want multiple files separated by species or room or something else.

Once in the linked Google Sheet, you can see that sheets actively linked to forms have a purple form icon. This means that these sheets will automatically update every time you enter new data through the corresponding form. Every submission is a separate line. If you change the form, new columns are added so you don’t lose data in the sheet either. However, you can manually edit or delete data in the sheets.

4. Organizing and Analyzing Data

Now that your data is easy to enter, store, and find, what do you do with it? Well, if you want a specific detail such as the last weight of your snake, you can simply look it up. This is incredibly valuable to reference but doesn’t tell you trends. Furthermore, the raw data in the sheets is not particularly easy to interpret because it’s hard to read. To fix this, you can add specific sheets to track topics that are important to you.

I am most interested in a detailed roster of all my animals, invertebrate colonies, and plants so I have separate pages for each of them. On the animal page, every animal has its own row. The columns are the animal’s name, scientific and common names, locale or morph info, sex, source and lineage info (blacked out for privacy), date of birth, date of acquisition, and age. I also keep a section of notes where I track anything significant about the animal. I also track animals I formally kept down lower in the same sheet and record the date of death as appropriate for those as well. The invertebrate sheet is similar but I only track colonies as a whole, not individual animals.

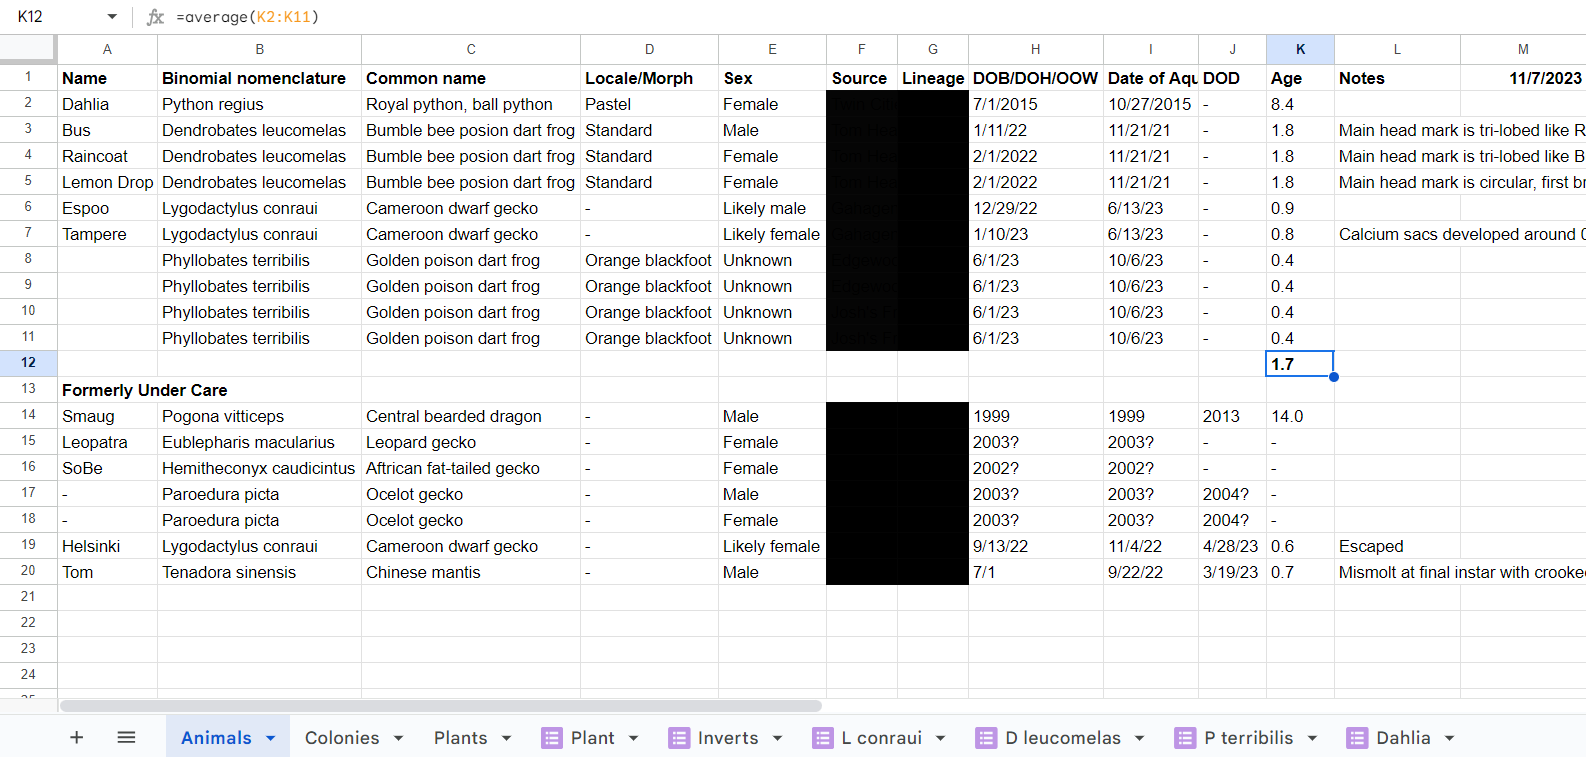
One benefit of using spreadsheets is the ability to use functions which are equations ranging from simple arithmetic to complicated if-then coding and statistical analysis. For example, the age of each animal is automatically updated every time I open the file. One cell (M1) has the Today function “=TODAY()” which will update with today’s date. Since spreadsheets think of dates as numbers, I can easily calculate the age of the first animal in years by typing “=(M1-H2)/365.25” where “M1” is the cell with today’s date, “H2” is this animal’s date of birth, and 365.25 is the average number of days in a year (don’t forget leap years!). The answer will likely have lots of decimal places, so use the formatting option to decrease the display of decimals to your desired amount without losing any of the data. I can then calculate the average of those ages by typing “=AVERAGE(K2:K11)” where “K2:K11” are the cells that contain the ages of all my animals.

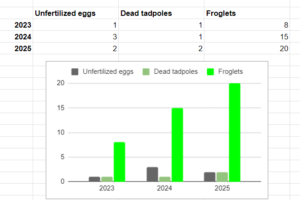
Another advantage of spreadsheets is the ability to easily make graphs. This is my first year breeding Dendrobates leucomelas poison dart frogs, and I am still figuring out what metrics I want to track. If I track how many eggs I collect, how many tadpoles develop, and how many froglets grow out, I can track any changes in reproductive success across the major stages of egg production, fertilization, and metamophorphosis. I added the relevant summary data at the end of the Dendrobates leucomelas sheet (along with data for 2024 and 2025 that I made up to illustrate the idea) and easily graphed the data to visualize trends.

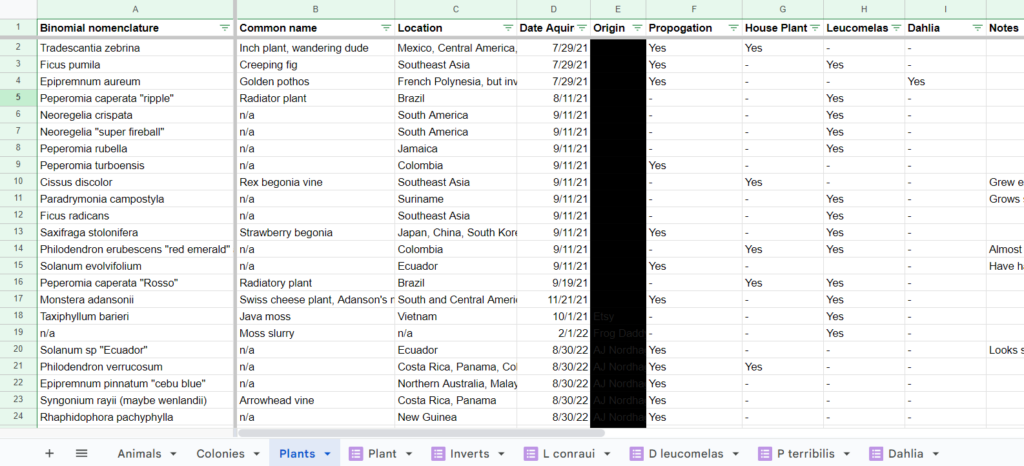
For my plants sheet, I track the scientific and common names, native location, date acquired, and source (blacked out for privacy) of each plant. Then I track where I currently have each plant, whether it’s currently in a propagation bin, in one of the animal enclosures, or as a house plant. Since I track any new plants in my Plants Form and update any new or lost plants in the relevant animal forms when I do enclosure maintenance, these lists are easy to maintain. Similar to the animal sheet, I keep track of the plants I used to have lower down on the same sheet and note any reasons why I lost them.

The possibilities for application are endless. You could chart the growth of a single animal or the productivity of a commercial breeding project. You could track feeding success based on the food type offered for hatchling snakes. You could summarize husbandry and incubation parameters for each breeding season and the relevant outcomes. You could do basic pedigree mapping and calculations of inbreeding coefficients for a breeding program. I’d love to hear what other ideas you have!

Conclusion

In conclusion, this system of using Google Forms and Sheets is a valuable tool for herpetoculturalists who want to maintain organized and up-to-date records of their captive populations. It offers speed, ease of customization, and adaptability, making it a versatile solution for keeping track of your beloved animals. Whether you’re a seasoned collector or just starting out, this method can help you better understand and care for your animals and evolve with you as you continue to advance in your practice.

Billy Sveen is a herpetoculturalist, physician, and bioethicist living in Minneapolis, Minnesota. Follow him on Instagram at @creepersherpetoculture.

DIY Snake Hide: How to Guide (video)

In this article, I show step by step how I created my own DIY snake hide! If you’d rather watch the video, then here ya go!

Before we get started two quick things:

  1. This idea originally came from this video: https://www.youtube.com/watch?v=2KCJA_WPIvs
  2. This is not cheaper or easier than buying a store-bought hide! You should only attempt this if you enjoy the crafting process. If you are someone who doesn’t want to spend the time building your own hides (I don’t blame you… it takes a long time!), then I definitely recommend using something like Reptile Basic Hide instead.

STEP ONE: TINFOIL

The first step is rolling out and folding up some tinfoil. I used 3  lengths of about 8′ long side by side and then folded it up to about a 2′ x 2′ square (roughly, probably slightly smaller).

Tinfoil Strips: DIY Snake hide

Tinfoil folded: DIY Snake Hide

Then, find a bowl or something of similar shape to use as a mold for your snake hide.  Stuff the tinfoil into the bowl!

Shaping the tinfoil
Shaping the tinfoil

Pop the foil out of the bowl and you’ll see you hide starting to take shape. You may also cut out a door hole at this phase.

STEP TWO: MASKING TAPE

Now that we have a rough hide made from tinfoil, the next step is covering the entire hide with a layer of masking tape. Both the outside and the inside of the hide!

Masking Tape over snake hide

Once the entire snake hide is covered in masking tape you can use this opportunity to add shape detail to the hide. By that I mean you can make the surface of the hide look more like a rock by adding indents and angles to the surface. I found giving the hide a good “whack” with an object worked well to create realistic looking indents.

DIY Snake hide: Masking tape with indents

STEP THREE: PAPER MACHE

Next up, paper mache! The entire snake hide needs to have at least one layer of paper mache.

What to use:

Using the foam brush and glue, paint on the tissue paper in small strips over the entire surface of the snake hide (outside and inside).

DIY Snake hide: paper mache

Let the paper mache completely dry before proceeding to the next step. This usually takes anywhere between 6-12 hours. Use a fan to reduce drying time.

STEP FOUR: PAPER CLAY

Last step before we paint! Go to your local craft store, or Amazon and pick up some Paper Clay. I do not recommend making your own paper clay, store-bought paper clay is non-toxic when dry (be sure to read the package)… I can’t say the same about DIY paper clay.

Paper clay DIY Snake Hide

Tear off chunks of the paper clay from the brick and begin spreading it across the top surface of the hide (no need to do the inside surface).

Paper clay DIY Snake Hide

Paper clay air dries very slowly so this is your opportunity to etch in any additional details you may want to add, crevasses and cracks for example.

Once you have fully applied a layer of clay, allow it to dry and harden. This takes about 12-24 hours or 30-40 mins in the oven set at 170°F (keep an eye on it if you do this!)

STEP FIVE: PAINT!

Once your hide’s clay has hardened, you may paint it!

DIY Snake Hide: Clay

I painted my DIY snake hides in two different ways:

Acrylic Craft Paint:

If you are gifted in the painting department, this is a good way to go. Painting your hide by hand gives you WAY more opportunity to be creative.

DIY Snake hide: Hand Painted

Stone Spray Paint:

I am not the best painter to I much preferred this method (plus it was quicker).

There are many different brands of ‘stone-textured’ spray paint out there, choose any color you like!

Stone Spray Paint- Dark

DIY Snake Hide: Spray Paint

Stone Spray Paint
Stone Spray Paint- Light

DIY Snake Hide: Spray paint

STEP SIX: SEAL & DONE!

Let your paint dry and seal it with a moisture sealer… then you are DONE!

Matte Finish Spray
Matte Finish Spray

DIY Snake Hide: Seal

Let your snake hide air out for at least 2-3 weeks before adding it into your animal’s enclosure!

DIY Snake Hide
DIY Snake Hide

DIY Snake Hide
DIY Snake Hide

DIY Snake Hide
DIY Snake Hide

How to Sterilize Wood for Reptiles

How to Sterilize Wood for Reptiles? I am guessing you are here because you recently had the experience below:

Every pet owner has had this experience:

Hey, I am going to stop by the pet store to pick up a climbing branch for my animal…

$35.00 for a stick?! HUH? 

Don’t you hate that? I know I do.

SCROLL TO THE BOTTOM FOR THE VIDEO


If you follow my blog or my YouTube videos you know that I am all about including natural features in your reptile’s enclosure to enrich their environment! Adding real branches to the enclosure is a great way to achieve that… but who wants to spend a bunch of money on something you can get outside for free!


How to Sterilize Wood for Reptiles

Collect your Wood!

First you need to find some wood! Here are somethings to keep in mind:

  • Stay with hardwood trees (Oak, Ash, Maple, etc.), softwood trees contain sap that can be toxic to your animal. Likewise, stay away from any hardwood trees that seem to be very “sappy” for whatever reason.
  • Find an area that that is unlikely to have pesticides or chemicals sprayed. I.e. stay away from areas close to farmers fields (pesticides) or areas that may have been fogged for mosquitoes.
  • I look for trees that have recently fallen down. You don’t want something that has been decaying for a long period of time. I guess live trees would work fine as well.

Forested Area

Dead tree

Clean Up the Branches

Once you have found a suitable branch you need to “clean it up”. In other words, use a hand saw and sandpaper to smooth out any areas that could cause an injury for your animal.

Tools: Sandpaper and saw

I generally use a hand saw to remove any sharp leftovers from smaller branches.

Remove any loose bark. Then,  smooth out the entire branch, once with course sand paper and once with fine sandpaper.

It is perfectly okay to leave some rough edges here and there as some animals will use it to scratch and/or shed themselves against, but you should remove anything that feels sharp to your touch.

How to Sterilize Wood for Reptiles: Method #1

If your branch is small enough to fit inside your oven, than you can follow the directions for Method #1 (and consider yourself lucky)!

  1. Set your oven to 250°F
  2. Set yourself a 10 minute timer (reoccurring)
  3. Place your branch in the oven and bake for 2 hours
  4. Check it every 10 minutes to ensure there is no charring

Bake wood for reptiles

10 Minute timer: Bake Wood for Reptiles

The heat of the oven will slowly kill any bacteria and microbes found deep inside the tissue of the wood. Using a higher temperature DOES NOT make this process any faster and increases your chance of starting a fire! I promise… 2 hours is not that long, especially considering how long Method #2 takes!

Once 2 hours has surpassed, pull the branch out of the oven, wait for it to cool off and you are done!

How to Bake wood for reptiles


How to Sterilize Wood for Reptiles: Method #2

If your branch is too large to fit inside your oven then you are stuck with Method #2! This method is equally effective, but takes much, much longer!

  1. Find a barrel, bin or tub large enough to contain your branch.
  2. Fill the tub with water, roughly keeping track of the volume of water you are using. I use a pail to fill my tub to keep track, i.e. 10 pails full of water is around 30 gallons total.

    Filling the tub, pail by pail
  3. Add bleach, using a ratio of 1/3 – 1/2 Cups of bleach for every gallon of water. Make sure you use regular bleach, do not use any products that have additives for laundry use, etc.

    Bleaching Reptile wood

    Bleach Ratio
  4. Let the branch soak for a full 24 hours. If you have a portion of your branch that is above the surface of the water (like mine in the photo), change the orientation of the branch after 12 hours so the exposed portion is now submerged.

    Bleaching reptile wood
  5. After 24 hours, drain the tub of the bleach solution. You will notice the color of your branch will be lighter, the bleach pulls the tanins and pigments out of the wood. You now need to flush the wood to remove the bleach. Soak the wood for at least 48 hours in fresh water, change the water every 2-8 hours.

    Flushing the bleach from the wood
  6. After the wood has been flushed of the bleach you now need to let it dry. Wood will take anywhere from 3-5 days to dry depending on the size and the climate you live in. You MUST wait for the wood to dry out completely before adding it to your reptiles enclosure for one of two reasons: 1) If you add it to a humid environment it will never dry and likely grow mold or 2) if you add it to an arid environment it will spike the humidity of your enclosure for several days.

Adding natural wood to your enclosure can really enhance your animal’s environment and I highly recommend you do it!

How to Sterilize Wood for Reptiles


Custom Terrariums: How to Guide (Video)

Custom Terrariums from Home

Custom Terrariums: DIY

Looking to create and build custom terrariums from home? Hopefully this article and video can point you in the right direction! This article would also be helpful if you are looking to convert an aquarium into a snake cage.

IN THIS ARTICLE:

  • Detailed description for Step by Step Process

  • Pros and Cons of a Glass Terrarium

  • Step by Step Video (Scroll to Bottom)

  • Pictures of Brazilian Rainbow Boa (Scroll to Bottom)

Should I build my own terrarium?

This is a good question. I believe you should only tackle a DIY build if:

    1. You aren’t trying to save money: DIY doesn’t always mean cheaper, after time and supplies doing-it-yourself can sometimes be more costly than purchasing something new.


  1. You actually enjoy building: This one seems obviously but some people go into a build with the idea that they are going to save money regardless of whether or not they enjoy building. Someone who doesn’t enjoy building will end up get very frustrated with the process and most likely spend MORE money than they would have if they just bought sometime brand new.

If you love to build and you don’t mind spending the money than you need to 100% move forward with your build! Custom terrariums will open up a door of possibilities for your animal, far beyond anything a store bought enclosure can provide.

In this article I breakdown my Custom Terrarium build for my Brazilian Rainbow Boa. If you want to skip right to the video, scroll right to the bottom of the article!

Side note: Why are Brazilian Rainbow Boas named after the rainbow? Scroll to the bottom for pictures of my boa… her colors will shock you!


Supplies and Plan

In the summer I stumbled across a stack of of old windows at a family farm. I immediately saw past their rough shape and started mentally building an enclosure out of them.

Old Windows


The windows cleaned up quite well and I was able to examine precisely what I had. What I had was this:

  • 8 Windows with dimensions of 36″ L x 21″ W

This would work!

Window Dimensions

There are very few examples of custom terrariums being built from glass for snakes (for reasons I discuss below) so I really had to think through a detailed plan to determine whether or not this would work.

Here is a picture of the sketch I came up with:

Sketch of Plan
When Building Custom terrariums: have a plan!

The plan was to:

  • Create a glass box using 3 full sized sheets of glass (36″ x 21″), 1 for the top, 1 for the bottom and 1 for the back.
  • I would have to cut glass for the side pieces which would measure roughly 21″ x 21″.
  • The front facing opening would be trimmed with “something” (at the time I wasn’t sure I was going to use glass or wood, I used wood).
  • A drop down acrylic door would be installed with the necessary ventilation drilled.
  • The sides, back and bottom would be blacked out with paint.

As I am typing this I am realizing this exact procedure would probably also be suitable for converting an aquarium or fish tank into a snake enclosure. 

The Glass Box

As stated about, the first step was to build the glass box.

First, I cut the glass for the sides. I used this cheap glass cutter dipped in mineral oil to score the glass. Once the glass was scored, a little bit of pressure was enough to force a break at the score line. Easy Peasy!

**Remember to wear safety glasses AND be mindful of the fact that the fresh cut edge of glass is sharp as hell!  Sand it down afterwards**

Cutting Glass
Cutting Glass

The actual assembly of the glass box was fairly straight forward. I followed Joey’s instruction from The King of DIY YouTube channel. If you’d like more detailed instructions on how to do this I highly recommend checking out his video here: https://www.youtube.com/watch?v=HSKIT2OLOYQ He has an AWESOME channel. Thanks for the help Joey!

Before I even started the build I spent some time thinking about the structure itself. How did I want the weight to be supported? It is very important to think this through.

Especially because I had to assemble the box in its wrong orientation. I.e. The front opening would have to face vertical during the assembly… assembling it in the right orientation would have required me to lower the top panel of glass on to the sides and back wall, I didn’t think that would be a smart way of doing it.

So the initial panel I placed flat on the table is actually the back panel. So back to the original point, how did I want the weight to be supported? Well I did not want any of the panels to be “hanging”, in other words I want the appropriate panels to be supporting the weight of the others.

Here’s how:

The side and back panels are placed directly on the bottom panel and the top panel is placed directly on top of the sides and back panels. This way the weight of the top panel is supported directly by the sides and back which is resting right on top of the bottom panel.

But remember… I had to assemble it out of its correct orientation so I had to keep that in mind. I.e. the “bottom” during the assembly was actually the back.

I set up strips of painters tape that could be flipped up once a sheet had been placed. The tape is strong enough to keep the glass in place while you work.

Other than that, all I did was run a bead of GE Silicone I (very important to use GE Silicone I and not II, I is non-toxic when dry) along the appropriate edges and place the glass in its rightful spot.


Custom Terrariums
Custom Terrariums

I used a square as I went to make sure things were straight. Silicone and glass is quite forgiving, you have time to move the panels around once they have been placed.

Squaring the tank
Squaring the tank: Custom Terrariums

Done!  Easy has that, it took only about 10 minutes from start to finish.

Glass tank

I did also add a bead of silicone on the inside seams to add more structure and a better seal.

Sealing inside seam
Sealing inside seam


Pros and Cons of  a Glass Terrarium

If you build your own custom terrariums you know there are pros and cons to the materials you use.  Here are the pros and cons of the glass terrarium I built.

Pros:
  • I already had the glass
  • Glass is relativity easy to work with
Cons:
  • It’s heavy
  • Hard to raise humidity- I solved that by having a front facing acrylic door that closes tightly
  • Too much light- snakes like to be in dark space, a clear glass terrarium can stress a snake out. I solved this by painting the sides black.
  • Hard to maintain temperature- glass tends to loose heat relatively easy compared to a plastic enclosure. I plan on using Reflectix to help insualte the walls… although I was also pretty surprised at how well the paint itself works as insulation.

Paint it Black

Time to paint the walls! This was also pretty straight forward.

A foam roller is really the best way to go here as it will not leave any brush marks.

Paint foam roller
Paint foam roller

At first I used regular black acrylic paint  as I was naive enough to think I would one have to do 1 MAYBE 2 coats. Wow was I wrong!  It took a good 5-6 coats to fully cover the glass, luckily the dry time between coats is very short (15 minutes).

Black acrylic paint
Black acrylic paint

The acrylic paint worked fine but since I required a larger volume of paint I upgraded to a quart of Black Indoor/Outdoor Latex paint. I didn’t notice a difference between the two types of paint, it was just cheaper to buy the latex paint due to the quantity I needed.

Indoor/Outdoor Latex Paint

I alternated between doing one coat with horizontal strokes and one coat with vertical strokes and eventually…

Painting the walls
Painting the walls

It was finished! I was actually pretty happy with the result… although I was definitely nervous through the first few coats.. “Is this ever going to cover..?”

Custom Terrariums: Painted wall


Wooden Trim

As stated above, I used wood to trim out the front facing hole where the door would go. I used:

  • Oak 1″ x 3″ for the bottom
  • Oak 1″ x 2″ for the top and sides

The purpose of the trim is three fold:

  1. Stop substrate from falling out
  2. A place to fasten the door and hinges
  3. A place for the door to rest and lock against

I decided to also paint the wood black to match the rest of the custom terrarium. I used the same latex paint from above, and I did 3 coats.

Painting Oak Runner Board

Painted Oak runner board


It was also important for me to seal the wood to protect it from moisture damage. I used 3 coats of Minwax Polyurethane to do the job.

Minwax Polyurethane
Minwax Polyurethane

I prepped the wood by running very fine steel wool over the entire surface to remove any fine hairs and wiped off the dust with a dry cloth. Then, I brushed on the polyurethane.

Brush on Minwax Polyurethane


Sealing the wood with Minwax Polyurethane

And of course, I went through the identical process with the side/top trim pieces!

Painting trim
Painting trim

The Sample Door

Now it was time to assemble the door. This was the part of the build I was the most worried about. Acrylic cracks quite easily and it is priced at $70/sheet!

So instead of jumping right into drilling the door panel … I decided to exercise some patience and used a scrap piece of acrylic and scrap piece of oak to build a “test door”.

I used black 3″ door hinges, pictured below. This way I could get a feel for what drilling through acrylic was like.

Test Door
Small Test Door

Instead of using screws for the top hinge, I replaced them with bolts and acorn nuts. Obviously, I couldn’t have 6 screws poking through the door into the enclosure.

Acorn nuts
Acorn Nuts


The Real Door

Once I felt ready I screwed the hinges to the bottom oak trim and then was ready to tackle drilling the holes for the door.

Attach Hinges
Attaching Hinges

I dry fit the acrylic door (I bought the acrylic sheet from the local hardware store and cut it to size) and marked off where the hinge holes needed to be drilled with a dry erase marker.

Custom Terrariums: Dry fit Door
Custom Terrariums: Dry fit door to hinges

Marking off hinge holes

Drill time!  The trick to drilling acrylic is you have to start small and slowly increase your bit size until you reach the desired size of hole. If you start with a bit to large, the acrylic will crack under stress… and so will you probably!

drill bits
9 bits for one hole!

Smallest Drill bit
Smallest Drill bit

Eventually I made it to the final bit… 2 hinges, each with 3 holes, each hole took 9 drill bits… wow!  But nothing cracked so going slow and steady was well worth it!

Last drill bit
Finally on last drill bit

I ended up having to make wooden spacers to sit between the hinge and the acrylic door. Without the spacer the door wasn’t sitting vertical, luckily the spacers completely corrected that. I eventually painted them black.

Wood Spacer
Wood Spacer

I also used black spray paint to paint the bolts black so they matched the hinge.


Spray painted bolts
Spray painted bolts

Whenever I create custom terrariums I try and make everything as professional looking as possible. I am happy with the way the hinges turned out, the wooden spacer completely blends in.

Completed hinge with spacer

Mounting the Trim

At this point I was ready to fasten the wooden trim to the glass terrarium. Gluing wood to glass is a relatively uncommon thing to do… I’m not sure I have seen anyone else online build custom terrariums this way.

I used the products No More Nails as the main adhesive for this job. I have been very impressed with this stuff! It bonds well to almost anything.

I first roughed up the gluing edge of the wood with 60 grit sand paper, and then ran a generous bead of No More Nails down the entire length of the board.

No More Nails
No More Nails

I used spring clamps to hold everything in place for 24 hrs.

Clamped Runner Board

And then I followed the same process for the top and side trim!

Custom Terrariums: Trim

Once everything was cured, I ran a bead of silicone on the inside seam to seal it and also provide extra support. Now that everything is dry, it feels incredibly sturdy!

As a nice touch, I also painted out the trip on the top. This way I could keep the top clear as a viewing panel but also could hide the No More Nails and Silicone that was holding everything together.

Top Trim
Top Trim

Top Trim painted black


Cam Lock

The light at the end of the tunnel! All I had left to do at this point was to add locks to the door, and polish up the acrylic!

I went with cam (or cabinet) locks because they are quite easy to install and do a good job of keeping everything secure.

Cam Locks
Cam Locks

The only down side to these locks was the size of hole I needed to drill to fit them into the acrylic door.  The locks require a 3/4″ hole, the largest drill bit I own is 5/8″ so I had to get creative.

Once I reach the 5/8″ bit, I dropped back to a smaller bit and slowly “carved” out the hole to increase its diameter.

Carving out the hole

I also used sand paper and a whole lot of elbow grease to bring the hole to size.

Sanding the hole
Sanding the hole

Eventually, it fit!

Custom Terrariums: Cam lock installed

Final Steps

A couple small things left and then I was done!

First, I had to polish the acrylic. Acrylic scratches pretty easily and over all the panel needed a good cleaning. I used a headlight buff kit to make the door as clean as I could!

Plastx Polish
Plastx Polish

I wasn’t quite satisfied with the way the door was locking. The cam locks made the door feel very secure on the top and sides, but I felt like the bottom could be flexed enough for a snake to try and squeeze through (and probably get stuck).

So I picked up some storm door panel clips and put one in each corner. This completely solved the problem!

Storm Door Panel Clips


Custom Terrarium Complete

And just like that, I was finished! I have to stay I am pleased with the way this turned out! It looks a lot better than I thought it would.

Here’s the deal

I made a plan, and I stuck to it! Scroll up to the top and take another look at the original plan sketch I drew up before starting the build.


Customer Terrarium
Custom Terrariums DIY

I live in an apartment, I do not own many tools. Because of that, I was required to very thoroughly plan the build. I built this terrarium in my head 100’s of times before even starting the work.

Custom Terrariums Drop down door
Custom Terrariums drop down door

Do not be intimated by making custom terrariums of your own! If you create a detailed plan and follow it, you can build anything you like! You do not need any expensive tools or specific craftsman skills, I have neither.

Custom Terrariums
Custom Terrariums made with glass

I hope this article can point you in the right direction, and like I said above, I believe this process would also work if you are wanting to convert a fish tank or aquarium into a terrarium!

CLICK HERE TO SEE THE TERRARIUM SET UP

Brazilian Rainbow Pictures (Click picture to expand)

Brazilian Rainbow Boa

Brazilian Rainbow Boa

Brazilian Rainbow Boa

Brazilian Rainbow Boa

Brazilian Rainbow Boa

Brazilian Rainbow Boa

Brazilian Rainbow Boa


Custom Terrariums Made with Glass Video


Thanks for visiting!

HOW TO: Convert Cabinet into Reptile Enclosure

This article is a step by step guide to how I used an old china cabinet to create by own DIY chameleon cage. If you are the type of person who likes to listen rather than read you can watch the video below:

DIY Chameleon Cage:


SCROLL TO THE BOTTOM TO FEW THE FINISHED PROJECT!

STEP ONE: FIND A PIECE OF CHEAP FURNITURE!

It is always I good idea to have a particular animal in mind when designing and building an vivarium. Or at least a “class” of animal. I converted this china cabinet initially as a diy chameleon cage project but since it was made with an arboreal species in mind, it also worked for my giant day gecko for a while as well.

So, if you have a species or a “class” of species (arboreal, terrestrial, tropical, arid, etc.), hit the classifieds and start looking for a good piece of furniture! Moving sales are great, normally you can get things fairly cheap.

This exact cabinet below I have seen for sale as high as $350 on the classifieds (although who knows what they actually got for it), I bought mine for $50 because the seller “just wanted it out of the house!”… they also may not have been fully aware of the actual value of the unit. Worked for me. Anyway, of course I went with this unit because of its height (3.5′), it was also about 2 feet wide and 2 feet deep (at its deepest point, it is a corner cabinet).


Corner China Cabinet, $50.00
DIY chameleon cage: Corner China Cabinet, $50.00

STEP 2: COME UP WITH A PLAN

Once you have your piece of furniture at home, spend some time planning. Some mistakes are forgiving but some are not, especially if you are working with a one-of-a-kind piece of furniture. This vivarium was being converted to a diy chameleon cage, therefore I needed it to:

  • Have good ventilation
  • Handle high humidity and mositure
  • Have proper lighting
  • Handle live plants

So, my plan was:

  1. Remove the top and side panels, replace with screen
  2. Seal any wood, as well as any seams
  3. Build some kind of “tray” in the bottom to hold soil and plants

Seems simple enough, let’s go!


STEP THREE: VENTILATION

The first thing I did was remove the side panels of glass. Chameleons require ample ventilation so adding more screen was necessary.

Removed side glass panels
DIY chameleon cage: Removed side glass panels

The top also needed to be removed. This accomplished two things:

  1. Increased ventilation
  2. Provided an area for a lighting system to function properly

As you can see, the top was solid wood. I used a Reciprocating Saw to cut it our completely.

Top of the cabinet
Top of the cabinet

Top of the cabinet removed
DIY chameleon cage: Top of the cabinet removed

I went to Home Depot and bought metal mesh screen and screen frame. I used the “tabs” that held the glass panel in to secure the screen frame to the cabinet.

On one side of the cabinet I included a “hand door,” pictured below. Hand doors are handy (sorry)… but they are! Especially if the main door is very large like the one on this cabinet. It is very convenient to be able to open a small door for feeding, misting, etc., rather than opening the entire front of the vivarium (especially if you are keeping flighty animals).

I don’t have a great picture of it but I also stapled screen to the top as well.

Screens installed to replace glass panels


STEP FOUR: SEAL!

Next on the agenda was sealing the china cabinet up to protect it from moisture damage.  First I used GE 100% Silicone I (make sure you use GE Silicone I, not II. Scroll to step 4 HERE to read why), to seal any of the seams in the cabinet.

Silicon filled seams

It was also necessary to seal any exposed wood. Keep in mind, the two major walls of the cabinet are actually mirror. This was great because it really reduced the amount of wood in the vivarium to pretty much just the door frames.

I used MINWAX Polycrylic to do this. It is water based and paints on very easy. Plus, once dry it is perfectly safe for your animals!


STEP FIVE: PLANT TRAY

The second last piece of the “diy chameleon cage” puzzle was building a tray to allow the vivarium to hold soil and live plants. This was my favorite part of the build!

The china cabinet came with glass shelves. I used one of these glass shelves as the base of the tray. Then, remember the glass panels I removed at the beginning? Well I took that glass, cut it to size and used silicone to secured it to the base to form “walls’ for the tray. It worked perfectly!

I let it cure for 24 hours and the filled it with water to ensure their were no leaks. There weren’t!

I found the glass edges to be a little sharp so I cover them with pipe insulation.

Glass plant tray
Glass plant tray

Glass tray completed


STEP SIX: BACKGROUND AND SET UP- DIY CHAMELEON CAGE

The last thing left to do before planting the vivarium was covering the mirror’s. As I said above the two large back walls of the vivarium were mirrors. This was good news and bad news. The good news was mirror’s are obviously made of glass meaning water damage wouldn’t be an issue. The bad news was it needed to be covered because it looked weird.

I went to staples and bought Quartet Cork Roll. It was inexpensive and worked great. I just glued it to the mirror using the silicone and was all set. The cork provided a more natural look to the vivarium’s background and is durable enough to handle moisture.

Cork background
Cork background

Then it was time to add soil, plants and decor!

diy chameleon cage
diy chameleon cage- door open

diy chameleon cage
diy chameleon cage- door closed

To plant the vivarium, I used:

Before it was sold, I swapped out some of the plants shown below:

diy chameleon cage- replanted

 This was a really fun project to work on and fairly simple to do! Again, the project was intended for chameleons but I was able to keep my giant day gecko in it for a few months before I sold it.

I encourage you to go out, find a piece of furniture and do a diy project of your own! Always remember the animal’s safety is priority number one!

Material List:


How to Make: Reptile Radiant Heat Panels (Video)

This post is a breakdown of my How to Make: Reptile Radiant Heat Panels Tutorial.

As I stated in the How to Make Reptile radiant heat panels video, I did not record the process but hopefully this will give you a really good idea of how I made my own radiant heat panels! This radiant heat panel was designed with snakes in mind, but would work for most reptiles.

Try this at your own risk! I take full responsibility for the safety of this setup for myself, but cannot recommend anyone copy what I have done unless you are willing to do the same.

Scroll to the bottom to view the total cost breakdown and PROS and CONS of this project!

Brainstorm

I stumbled across a very dated post on Ball-Pythons.net, which the original poster described how he build he’s own radiant heat panel from Flexwatt Heat tape and plexiglass. Unfortunately, all the pictures were gone and it was pretty tough to fully understand how he did it (maybe you’ll have better luck?). But it got me thinking!

I already had some spare Exo-Terra heat cable, which in my opinion is slightly safer than heat tape for some reason. I think mainly there is less chance of user error with heat cable as it requires no wiring, etc.

The first problem was figuring out what material(s) to house the cable in. I tossed around a bunch of ideas from ceramic tile to acrylic sheets. Finally I decided to got with pegboard for the bottom and Styrofoam for the top.

The Materials: DIY Reptile Radiant Heat Panels

Below is a picture of the pegboard. You can buy pegboard in your local hardware store in the plywood section. It is very inexpensive. I settled on pegboard for a few reasons:

  • Light weight
  • Porous i.e. the cable has the opportunity to heat air as well rather than just the board itself
  • High ignition temperature (450-500°F)

Reptile Radiant heat panels

As I said above, the top layer is Styrofoam. I went with 1″ thick pink Styrofoam that I found at my local hardware store in a 2′ x 2′ square. I settled on Styrofoam because:

  • Again, light weight
  • High ignition temperature (500°F)
  • Reduce heat transferring in the wrong direction i.e. I wanted to avoid (as best I could), heat through the top of the panel

Stryofoam for reptile radiant heat panels

**Ignition temperature refers to the temperature these materials will combust at WITHOUT a spark. These temperatures are well above anything the heat cable is capable of producing… although that doesn’t mean things can’t over heat and start melting/release fumes. I just means I won’t burn the house down.  In any case, they are on a thermostat anyway!**

It was also necessary to pick up a roll of Multi-Purpose Foil Tape to help reflect the heat in the right direction, more on that below!

Foil Tape: Reptile Radiant Heat Panels

And of course, I needed the heat cable! I went with Exo Terra Heater Cable-25-Watt. This cable is 5m long, they also make a longer (7m) cable that comes in a higher wattage (50W). The 25W cable was more than enough and it is the only size my local pet store sells.


The Process

Step One:

I cut the pegboard (actually I had the hardware store throw it on the table saw) into a 1′ x 1′ square.

Step Two:

I cut the Styrofoam into a 1′ x 1′ square.

Step Three:

I snaked the heat cable back and fourth on the pegboard. I used Gorilla Tape to hold it in place. DO NOT OVERLAP THE CABLE in any place! That can create a dangerous hot spot. You are looking to have each “row” of cable at least 3 cm apart. Luckily if you let the pegboard guide you, it will be perfectly spaced.

The picture below is my best attempt at recreating what I did!

Step Four:

Then, I took my 1′ x 1′ square of Styrofoam (the picture is of a scrap piece of Styrofoam, it is larger than 1′ x 1′ so you have to use your imagination) and completely covered one side with the reflective tape.

Step Five:

Now it was time to put it all together! At this point I had:

  • 1′ x 1′ pegboard with heat cable attached to one side
  • 1′ x 1′ Styrofoam with foil tape completely covering one side

I sandwiched it all together by taping the Styrofoam to the pegboard, creating a nice little package. I used the Gorilla Tape to hold the two pieces together and then sealed the sides with Foil Tape.

If you were to take a cross-section of my diy radiant heat panel you would see this:

TOP TO BOTTOM:

  • Styrofoam
  • Foil Tape
  • Heat Cable
  • Pegboard

Hopefully that is relativity clear!

Finished: DIY Reptile Radiant Heat Panels


Temperature Control:

As I stated in the video I will be running these on a thermostat to control the temperature.  It was suppose to be here already but it got damaged in shipping, I am now waiting for a different one to arrive. As you can see… I have a blank spot on my “control panel” waiting to be filled! Thermostats are very important as they help prevent injury to the animals and fires! 

**Since these are diy radiant heat panels, my risk of fire may be higher than a store bought RHP.  My first line of defense is a thermostat, and my second is the high ignition temperatures of the materials I choose. Both of these combined will make accidents extremely unlikely**

Thermostat is a must! Reptile Radiant Heat Panels

I am pretty excited to get my thermostat in the mail because it is WI-FI CONTROLLED… or at least that is what it claims.  The thermostat is: Willhi Wifi Digital Smart Temperature Controller:


Hopefully this will allow me to monitor temperatures when I am away from home! I do have another (non-Wifi) thermostat from this same company (as you can see in the photo above). I really like it! Here’s why:

  • It has a very long cable for the probe
  • The probe itself is very slim (not bulky like some probes)
  • The probe cable can be disconnected from the actual controller which can be very handy if you probe is taped in place like mine are. If the cable accidentally comes unplugged the controller beeps like all hell broke loose
  • Relatively inexpensive compared to other herp thermostats

I will make sure to review the Wi-Fi model when I get it.

Even though I have two diy radiant heat panels running in two separate enclosures, I am only running them off of a single thermostat and I will set it to 85°F.  Most likely they will run constantly as I have never seen the panels get the warm side over 84°F. I will place the probe in the top enclosure. The metrics in each enclosure are basically identical meaning if the top enclosure gets to hot, the bottom one is likely too hot as well.

Worst case scenario: the bottom one malfunctions and begins to over heat. If this occurs, it will trip the probe in the top enclosure before any damage can happen due to the heat that transfer through the top of the RHP’s.

How I use them and Results:

The reptile radiant heat panel’s are set on a timer. They turn on at 7:00 am and turn off at 10:00 pm, this allows me to simulate a temperature drop during the night.

I have been extremely impressed with the way these have held up so far. They bring they warm sides up to about 81-83°F by mid day and even create some warm spots on the wood decor of about 85-86°F. Although keep in mind, I do have a heat mat for a hot spot.  In conclusion:

Pros:

  • Inexpensive
  • Easy to make
  • Creates ideal warm side ambient temperatures

Cons:

  • Not powerful enough to create a hot spot of 90°F i.e. a heat mat is still necessary (maybe higher wattage would help?)
  • The Gorilla Tape is starting to soften a little bit due to the heat, I would probably use a more heat resistant tape next time around.


Material List/Cost Breakdown (CAD):

** These are the prices I paid. Click the links below to view the current prices**

  • Styrofoam= $8.00 (Home Depot)
  • Pegboard= $10.00 (Home Depot)
  • Exo Terra Heater Cable-25-Watt= Click the link to view price (I paid $35 at PetSmart)
  • Foil TapeClick the link to view price (I paid $12 at Home Depot) 
  • Gorilla Tape= Click the link to view current price (I paid $15 at Home Depot, although I’d probably recommend a tape more resistant to heat)

TOTAL COST: $80.00 for two DIY Reptile Radiant Heat Panels! i.e. $40.00/RHP

Again, try this at your own risk!  Be aware that this is a less safe option compared to a store bought RHP! Always run these on a thermostat!

DIY Radiant Heat Panel for reptiles

DIY Snake Cage: Part 3

DIY Snake Cage: Part 3. Final Stretch!

Scroll to the bottom for a material list with prices.

DIY SNAKE CAGE: PART 3

STEP ZERO: LET ME EXPLAIN

Okay, let me explain! The reason I have a step zero is because I went ahead and did a few things without filming myself.  The picture below shows what those particular items were.

  1. Installed a short strip of LED lights
  2. Stained the oak runner board
  3. Bolted on the radiant heat panel
  4. I fed the light/RHP cords through a vent hole (second picture below)

STEP ONE: GLASS TIME

This was definitely the most rewarding part of the entire process (besides introducing the snakes to their new enclosures)! Installing the glass really pulled the entire project together. Before I get to the actual glass, lets talk about the tracks.

I ordered the glass and the tracks from the same local glass shop in my city. The picture below shows what the tracks look like.

Below is a picture of extremely clear glass… so basically its a picture of nothing! The only downside of glass was the expense.  Here is the actual order description the company gave me:

  • 4 lites (sheets) of 5mm clear tempered glass @ 23 5/8” x 16 5/8”, complete with polished heights, minimum widths and “touched” corners to allow for easy sliding  
  • 2 Pieces of top track @ 45 ¼” & 2 pieces of bottom track @ 45 ¼” (cut to size)
  • Note: To fit a cabinet opening of 45 ¼” x 17 3/16”, complete with 2” overlap in the middle. Deductions have been made on height to accommodate the track. $287.00+taxes

The actual glass was about $200.00, which really wasn’t bad i.e. $50.00/sheet. But after paying for the tracks and service fees (polishing etc.), it added up to something higher than I was initially looking to spend.

I took a few days to pull the trigger on the order, but eventually I just realized the glass NEEDS to be done right. It is not an item you want to cheap out on. The company that did it was great as well, I essentially gave them the size of the hole and they did all the calculations to make sure the glass would fit (certain precise, dedications need to be made to ensure the glass can be removed from the track after installation).

I also recommend tempered glass if you plan to build something similar. It is so much strong and so much safer than traditional plate glass.

Okay, back to the build!

I used the product,  No More Nails Adhesive to glue the tracks down to the cabinet. At first I thought it would be a good idea to reinforce the tracks with small screws after I glued them down. I do not recommend doing that! To make a long story short, the screw I used got jammed, stripped and then I had no way to remove it. Luckily it didn’t impact the glass sliding through the track.

In summary… a liberal amount of  No More Nails Adhesive is more than strong enough to get the job done!

Once the rail was coated in glue, I pressed it in place and weighed it down for 20 minutes or so. After 20 minutes, it was rock solid. I am amazed at how well that glue holds!

Of course, I then glued and compressed the bottom track too.

STEP TWO: SET UP

And voila, glass is installed!  The next thing I did was run a 24 hour, heat/ humidity test.  It is very important to do this when you set up a new enclosure!

It is so tempting to throw an animal in as soon as the enclosure is finished but patience is very important here. You need to ensure the enclosure is safe for the animal first.

Setting up the enclosure:
  1. Tape heat mats to bottom of each enclosure
  2. Hook up thermostats and probes
  3. Plug in radiant heat panels (set on timer, on at 7am, off at 10pm)
  4. Plug in lights (set on timer, on at 9am, off at 8pm)
  5. Place large water bowel in enclosure
  6. Add thermometers and hygrometers
  7. Sit back and wait!

The most important thing was properly calibrating the thermostats. When keeping boas, you are generally looking for a 90°F hot spot on the inside of the enclosure. Although, my thermostats need to be set for much hotter. Reason being, is the mats are taped underneath the enclosure, meaning the heat has to penetrate through the melamine (3\4″ and the vinyl floor).

The thermostat probe is sandwiched between the heat mat and the bottom of the enclosure which means it is exposed to much warmer temperatures than the inside of the enclosure gets to. Both my thermostats had to be set to roughly 98-100°F to achieve an ideal hot spot on the inside of the enclosure.

After 24 hours of testing my metrics were as follows:

  • Hot Side Ambient: 81°F
  • Cold Side Ambient: 76°F
  • Hot Spot: 88-91°F
  • Humidity: 60%

Everything looked great!  Although I did end up bumping the humidity of the reptile room up so I could increase the enclosure humidity to about 75%.


STEP FOUR: DECOR, RELEASE THE BOAS!

Now that I was confident that I had balanced and ideal parameters inside the enclosure, it was time to officially set them up!

I set a hide up on each side, through a layer of coconut husk down and set up some driftwood that I had found (and treated) a few weeks back. I also threw in some Exo-Terra foliage for some ground cover.

Time to introduce the homeowners! Here is Winston taking he first “steps” into his new home. Winston is 50% Colombian/ 50% Sonoran Desert, and since he is a male, I am thinking a 4′ enclosure might be large enough to be his forever home. Or at least his home for many years still!

And here is my second boa, Whip checking out her new place. She is full Colombian, so this will only be her home for the next few years likely.

DIY SNAKE CAGE: PART 3

MATERIAL LIST (appropriate prices, in Canadian dollars), keep in mind I built TWO enclosures so this is the list of materials I used to do both.

TOTAL: $345.00

TOTAL COST BREAKDOWN OF DIY SNAKE CAGE PROJECT:

PART ONE: $101.50

PART TWO: $60.00

PART THREE: $345.00

TOTAL COST: $506.50 (~$255.00 per enclosure)

Not Bad considering a PVC cage of similar height (with lighting and heat) would have been closer to $350-$400 EACH before taxes and shipping (Canadian dollars)!

We are DONE the DIY SNAKE CAGE Project!!  Thank you very much for reading along/ watching the videos I have made. Also, once I receive my cabinet locks and finger pulls for the glass, I plan doing a quick update so stay tuned for that!

If you have any questions please add them in the comments or contact me directly, using the subject line “DIY Snake Cage”

DIY Snake Cage: Part 2

DIY Snake Cage: Part 2. Let’s GO!

Scroll to the bottom for a material list with prices.

DIY SNAKE CAGE: PART 2

STEP ONE: TIME TO LAY SOME FLOOR

Ok, so now it was time to start laying the floor in the enclosure. This flooring is basic vinyl flooring, it comes in a large roll. I found it in a discount box at Home Depot! I went with a large plank, hardwood appearance. Here are the main benefits vinyl flooring provide:

  • Incredibly easy to clean
  • Durable
  • Seals and protects the floor and back wall from damage
  • It actually looks pretty decent, there are may different designs to choose from (ceramic, brick, rock, wood)
  • Easy to install
  • Absorbs heat
  • Non-abrasive on the animals

I used an exacto blade to roughly cut out the size of vinyl floor I needed.  I decided to cover only the bottom and back wall with the flooring.  The sides do not see enough wear for flooring to be necessary, nor does the ceiling.

Cutting vinyl flooring

Then, I dry fit the piece of vinyl into the enclosure. Once I was happy  with the fit, I was ready to glue it down.

NOTICE: I only used a single piece of flooring for the back and the bottom.

This means there is no seam where the back and bottom of the enclosure meet.  This is definitely the way to go as now I don’t have to worry at all about any leaks, etc.

Dry fit vinyl floor

Instead of using proper vinyl floor adhesive, I used my trusty tube of  General Electric Silicone I. I used silicone to glue the floor down for 2 reasons:

  1. I knew it would hold (silicone sticks to pretty much anything)
  2. It is completely non-toxic to the animals when it is dry

First I laid down a bead of silicone in a “squiggle” pattern on both the back wall. Then, I used a scrap piece of hardboard (from Part 1) to smear the silicone out as best I could.

Silicone

Spreading out Silicone

Once I finished smearing the silicone on the back wall, I “squiggle-smeared” the bottom with its share of silicone as well (not pictured).

Now it was time to insert the vinyl flooring in for real. The flooring is very easy to work with and the silicone is quite forgiving. I was able to set the floor in the enclosure and wiggle it around till it sat in the position I wanted.

Inserting floor

I used a rolling pin to press the flooring into the silicone to ensure they were bonded together thoroughly.  Then, I cut off the excess flooring that was hanging off the bottom.

Pressing down floor

And finally, you guessed it… more silicone! (my personal rule of thumb: if your lungs and eyes aren’t burning… you haven’t used enough). I used more silicone to seal the seams where the vinyl floor meets the melamine of the cabinet.

Silicone seams


STEP TWO: WE HAVE A RUNNER

I’m not sure if you can actually call that board in the picture below a “runner board” but that’s what I call it! Anyway, at this point I was ready to install the runner board along the bottom of the enclosure.

This board is being installed so the glass tracks on the bottom have a place to sit. Technically, I could have installed the glass track directly to the cabinet itself but this way substrate doesn’t fall out every time I open the doors.

The board is a 1″ x 3″ and the wood is oak although you could probably use any type of wood (hardwoods should only be used).

Dry fit runner board

I punched about 5-6 screws through the bottom of the enclosure to secure the runner board in place.

Screw in runner board

And of course… more silicone!  This is the inside seam i.e. where the oak board meets the vinyl floor. Seriously, when in doubt you should seal it up!  There is no point in risking moisture damage. Realistically, oak can resist a lot of moisture but it just makes more sense to make sure it is completely sealed.

Silicone seam

STEP THREE: SKIS!

One little thing I did that I forgot to record was add “skis” to the bottom of the enclosures. I made these from scrape 1″ x 3″ lumbar I had lying around as well as some left over vinyl flooring. I installed 3 of them as you can see two pictures down. These skis serve two main purposes:

  1. They allow air flow between the top and bottom enclosure and the bottom enclosure and the carpet in the reptile room. Since I am using heat mats for a hot spot, air flow is very important to reduce heat transfer between enclosures.
  2. They make the enclosures far easier to slide around on the floor when moving.These skis weren’t in the original plans but I am glad I thought of them! Sometimes the ideas that come to you on the fly are the best ones!

Bottom "skis"Three skis on bottom

STEP FOUR: BACK TO THE REPTILE ROOM AND WAIT…

At this point  all the dirty work is done! I am very pleased with the way the enclosures have turned out.  Part two is complete!

Unfortunately, the glass I ordered took about two weeks to come in which left me waiting in anticipation.  If you are as excited as I was to install the glass… check out PART 3!

Also, at the end of the video I briefly discuss how I built my own radiant heat panels shown in the photo below. I ended up making a more detailed version to help answer any questions some of you had, you can check that video out HERE –> DIY RADIANT HEAT PANEL

DIY Radiant heat panelSnake cages without glass

DIY SNAKE CAGE: PART 2

MATERIAL LIST (appropriate prices, in Canadian dollars), keep in mind I built TWO enclosures so this is the list of materials I used to do both.

  • Vinyl floor= $45.00 (had tons left over)
  • Silicone= (see Part 1)
  • Oak board, 8′ L 1″x3″= $15.00

TOTAL: $60.00

Move on to DIY SNAKE CAGE: Part 3 to install the glass and any other finishing touches!

DIY Snake Cage: Part 1

Welcome to my DIY Snake Cage 3 Part series!

I just finished uploading a video tutorial for my latest DIY project, which was converting two cabinets into snake enclosures for my boas.  I have posted Part 1 of the video below, but in case you don’t have time right now to watch it… OR maybe you are at work and you need to make it look like you’re “working” I have broken it down into steps below with pictures!  Although I highly recommend eventually watching the video as I go into more detail.

Scroll to the bottom for a material list with prices.

DIY SNAKE CAGE: PART 1

STEP ONE: ACQUISITION 

Hunt the local classifieds for cabinets and/or shelving units! These can be very useful, especially if you’re like me and have limited carpentry skills and/or a limited space to work in (I live in an apartment). Usually old cabinets can be picked up for rather cheap and provide a solid foundational  structure to work with.

The cabinets I found were vertical standing, about 72″ high, 20″ wide and 18″ deep. Originally they were used to house my Exo-Terra 18x18x24, which they held perfectly.

I rotated the pic below so you are able to sort of picture what they originally looked like.  But don’t stare at that picture for too long… it will really mess with your mind.

diy snake cage
DIY Cabinets into Snake Cage

Eventually I moved my Exo Terra’s from them and got the idea to lay them on their side so I could store a large bin in each one as shown in the picture below.  But just like my reptile induced debt, my snakes grew and it was time for an upgrade.

STEP TWO: DEMOLITION

Next I had to remove parts of the cabinet that I either hated or did not need. These particular shelves had two things that fell into both categories:

  1. The back panel:The back panel was maybe of a very thin sheet of essentially a melamine type material. I had punched holes through it in the past and it was just overall too flimsy of a material to have as a back wall, so it had to go.
  2. The fixed shelf: These cabinets came with several removable shelves as well as a few fixed shelves. The fixed shelves are held in place with wooden pins. I had to remove the highest shelf, as I wanted to use the full 46″ length the cabinets had to offer.

If you are interested in watching  me struggle , watch me try and cut that shelf out with a hand saw. It’s pretty funny.


STEP THREE: “CONSTRUCTION” 

Now it was time to add a new back to the unit. I choose a product called “hardboard” which I found at Home Depot. It is essentially a very thick, very hard (I’m going to stop you right there)… very compressed sheet of cardboard.

Hardboard was cheaper than plywood and has more than enough structural integrity. Plus it would eventually be sealed with vinyl floor and silicon so I wasn’t worried about water damage, etc.

First, I ran a bead of No More Nails Adhesive by LePage around the perimeter of the unit. I really recommend picking up a tube of No More Nails, even just to have for around the house. I was amazed at how well it adhered once it was dry, and it basically has zero chemical smell. Although, I can’t say it is non-toxic for animals though so I’d stay away from using it where the animals can readily access just to be safe.

Once I compressed the hardboard into the adhesive, I added a few screws per side for some extra support. The screws probably weren’t necessary but, why not?

STEP FOUR: SEAL ‘ER

It is very important to seal up all seams in the enclosure! Melamine and wood cabinets can quickly become damaged due to moisture, so I went heavy on the silicon! Boa constrictors aren’t kept in wet/damp enclosures by any means but their urates/pee can do some real damage.

I used General Electric Silicone I. This is very IMPORTANT because GE Silicon I is 100% non-toxic and safe for animals once dry. GE Silicon II, is not!

GE Silicon II is labelled as “Mold Free”, meaning they add a chemical to the silicon to prevent any mold growth. This chemical is toxic to animals. GE Silicon I is labelled as “Mold Resistant” meaning no additional chemicals are added.

DIY SNAKE CAGE: PART 1

MATERIAL LIST (APPROXIMATE PRICES, in Canadian Dollars), also keep in mind I built TWO enclosures so this is the list of materials I used to do both.

  • Cabinets= $50.00 for both
  • 2 x Hardboard 2′ x 4′ sheet= $17.00
  • No More Nails= $9.50
  • 4 x tubes GE I Silicon= $20.00
  • Screws= $5.00

TOTAL: $101.50

Okay, that is enough for DIY Snake Cage: Part 1!  Next up is installing the vinyl flooring, below is a shot of the flooring I picked. Click PART TWO to see how it got installed.

Privacy Policy   |  Affiliate Disclaimer  |  Full Disclaimer  |  Terms of Service  |  Copyright text 2021 by Animals at Home