Brazilian Rainbow Boa Quarantine Setup

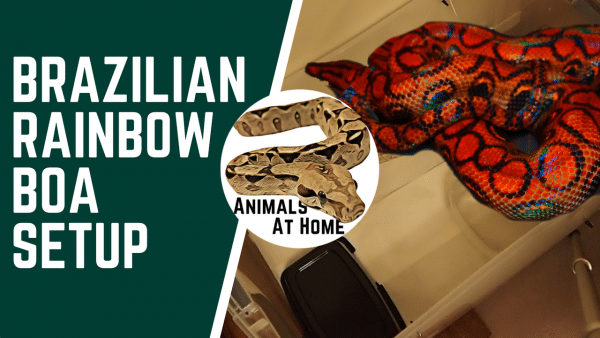
Brazilian Rainbow Boa Setup:

Consider this a “check mark” off my wish list! I have recently added a Brazilian Rainbow Boa to my collection and I could not be more excited! In this article I will breakdown how I setup the quarantine tub for this new addition (scroll to the bottom for the video).

Brazilian Rainbow Boa

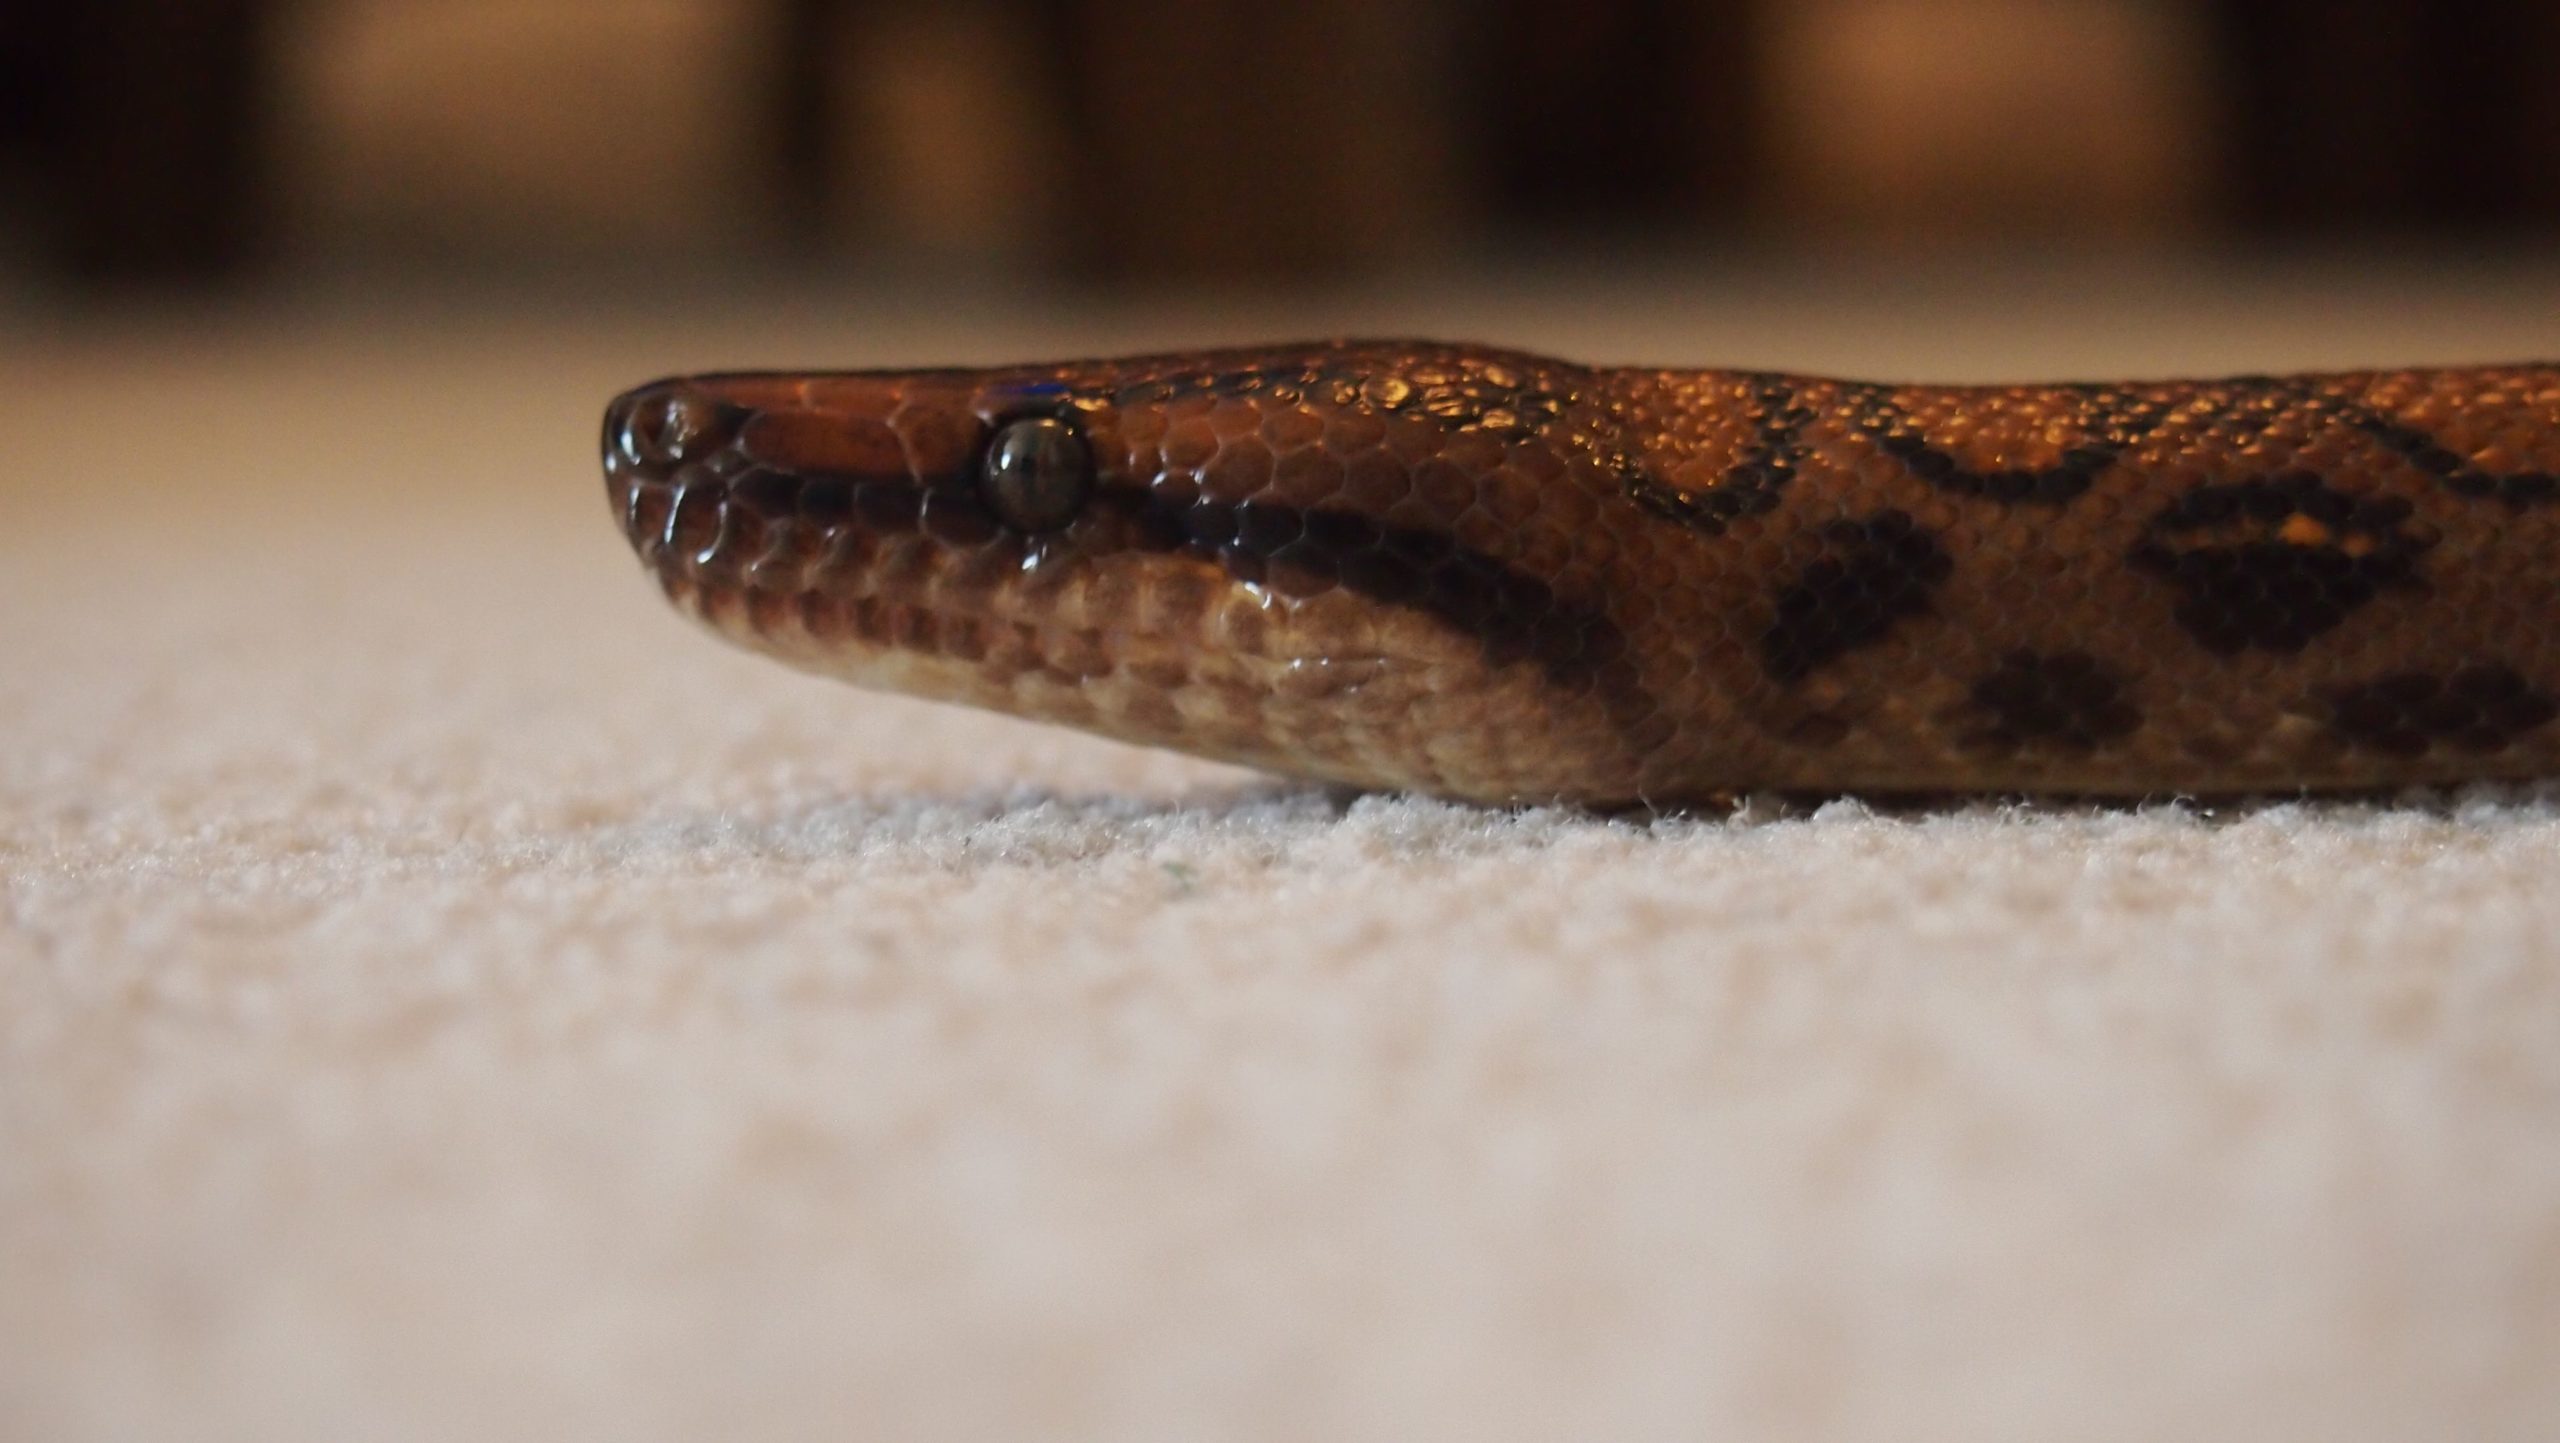
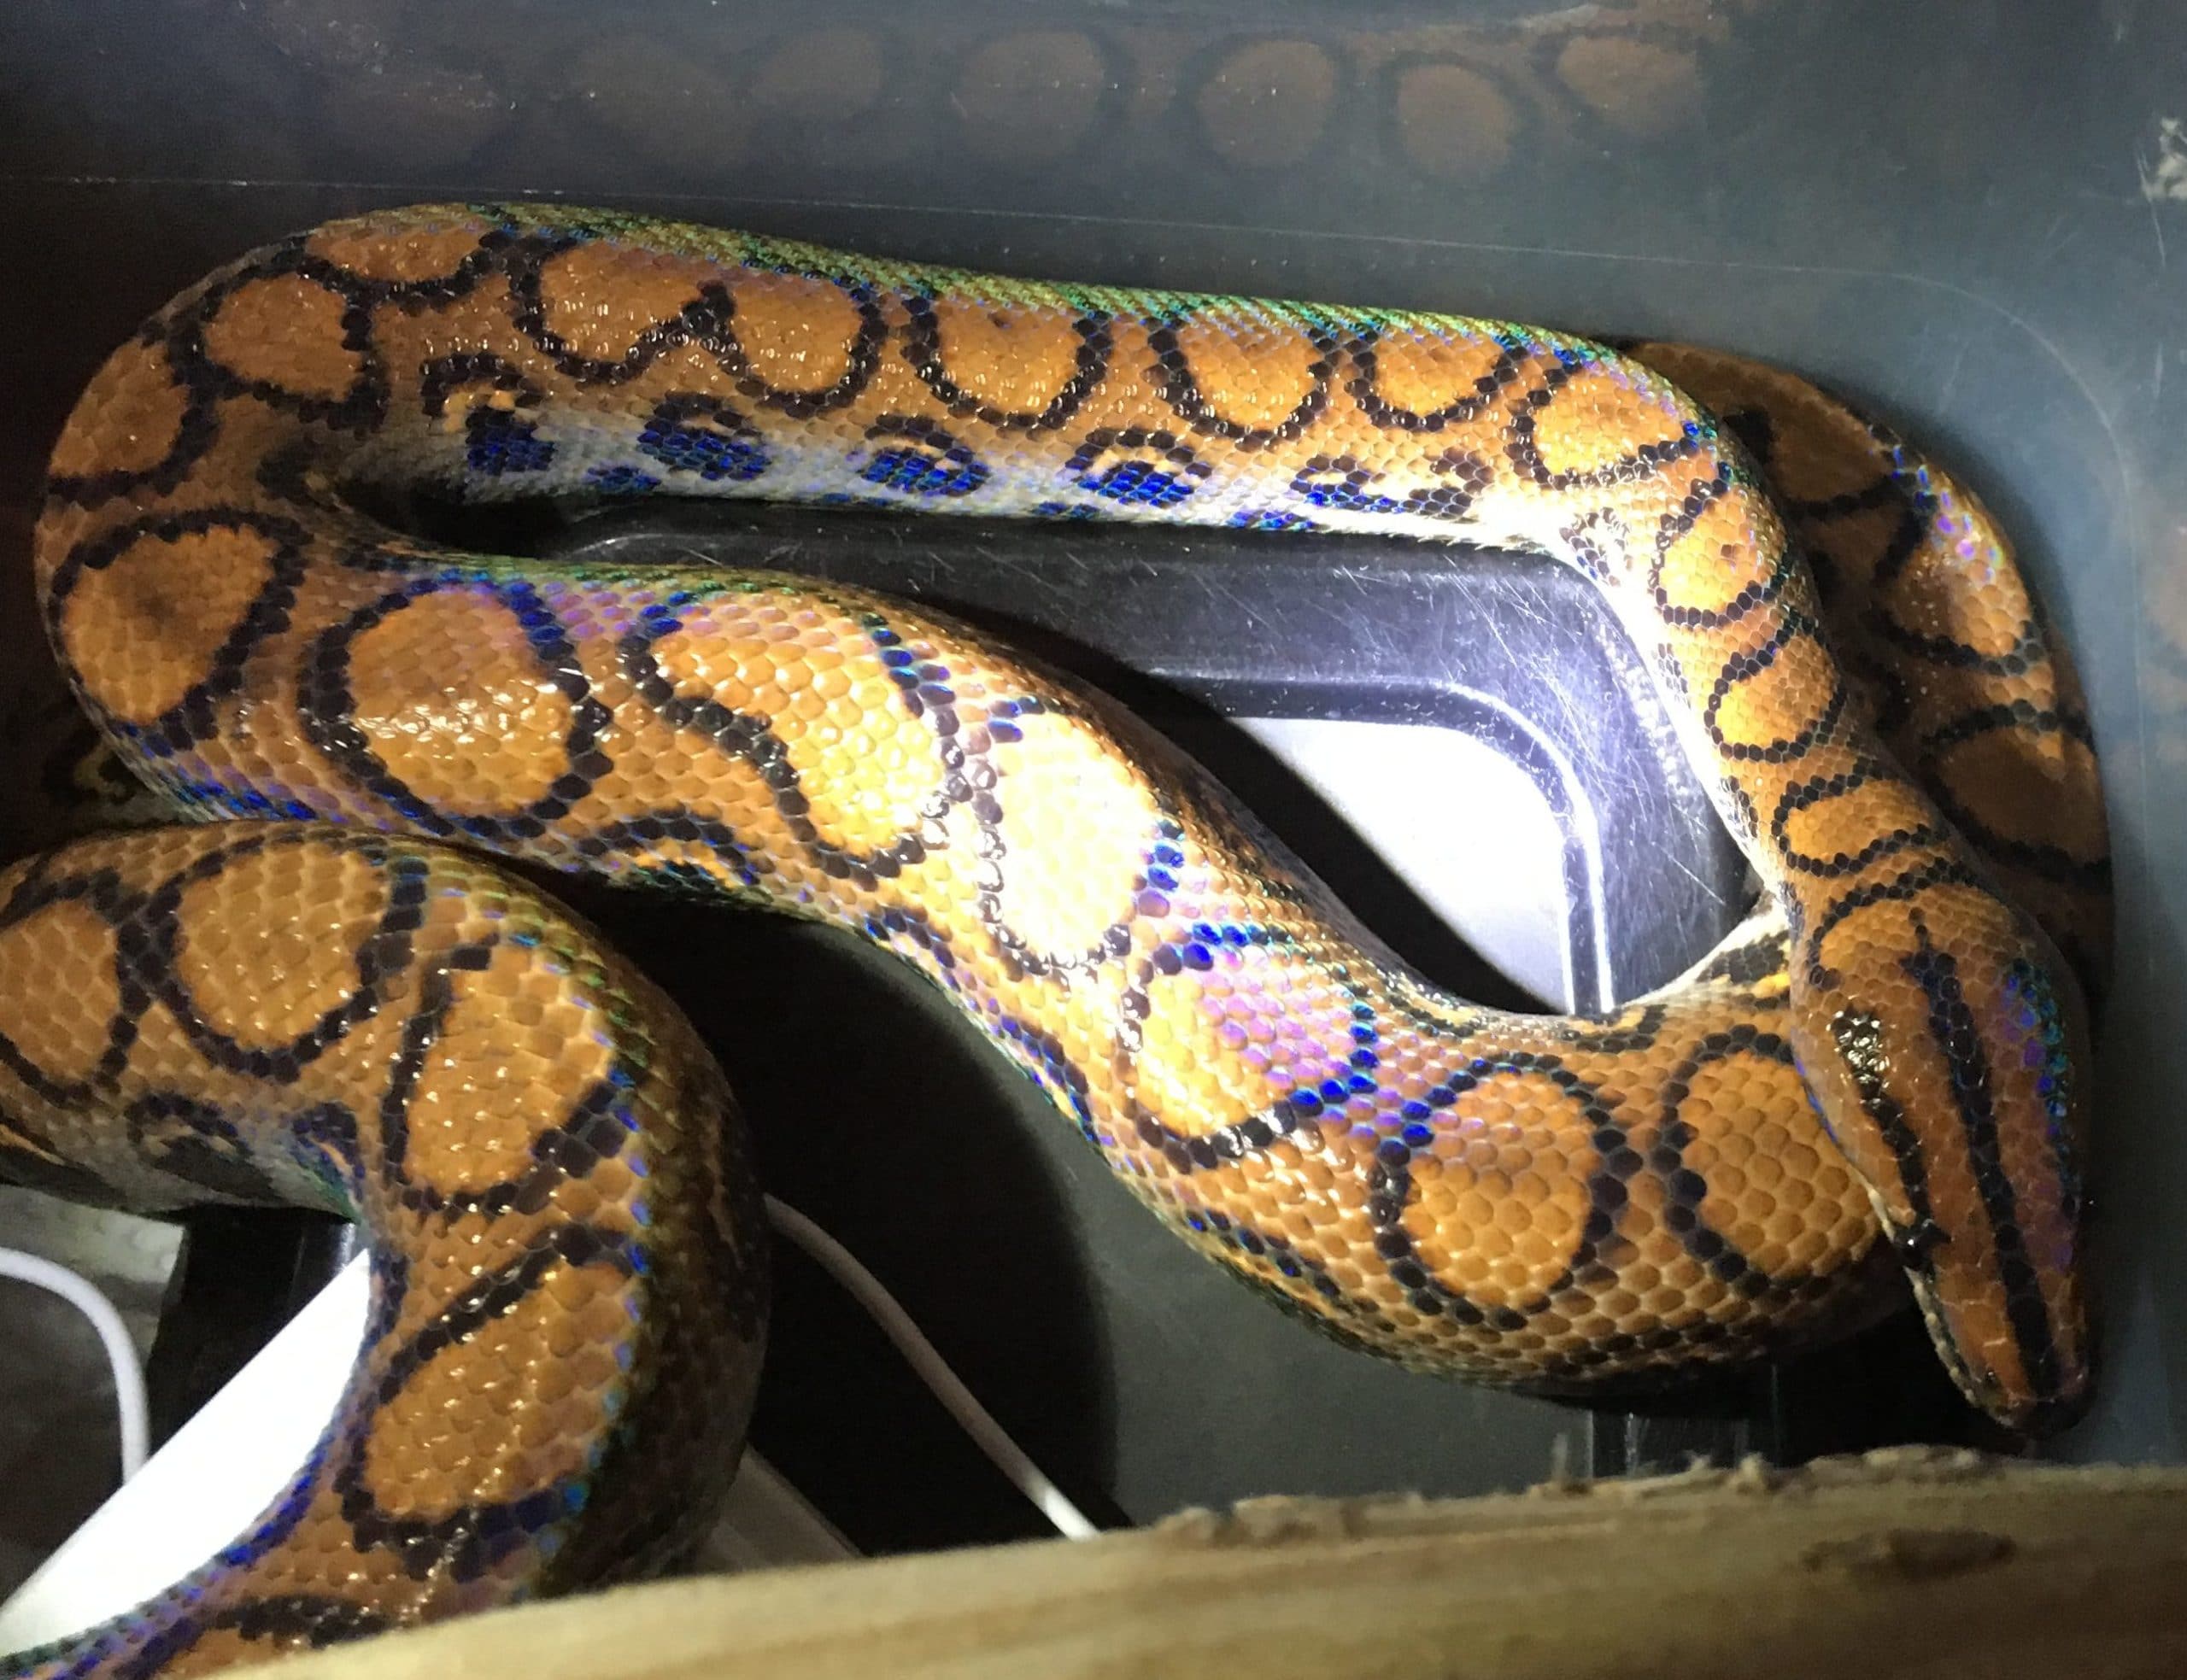
Brazilian Rainbow boas are some of the most beautiful snakes in the world. They range from deep to bright orange in color with a very interesting spotted pattern. Although, what really sets them apart from other snakes is there brilliant iridescence. A rainbow boa under sunlight (or artificial light), explodes with color. They truly glow.

Naturally, when a 2 year old female was posted on my local classifieds I had to scoop her up!

I plan on building her a new adult sized enclosure in the coming weeks but first she must be quarantined!


Why Quarantine? 

Anytime you bring a new animal into your home, a quarantine period is highly recommended. An animal may appear healthy but could be carrying parasites, or bacteria/viral infections that could be transmitted to your other animals. A isolation period of 60-90 days is recommended, some people even do 5-6 months to be safe. This means, your new animal should be kept in a separate room (or floor or building if possible) and any tools should be cleaned with bleach before/after use.

Brazilian Rainbow Boa Setup

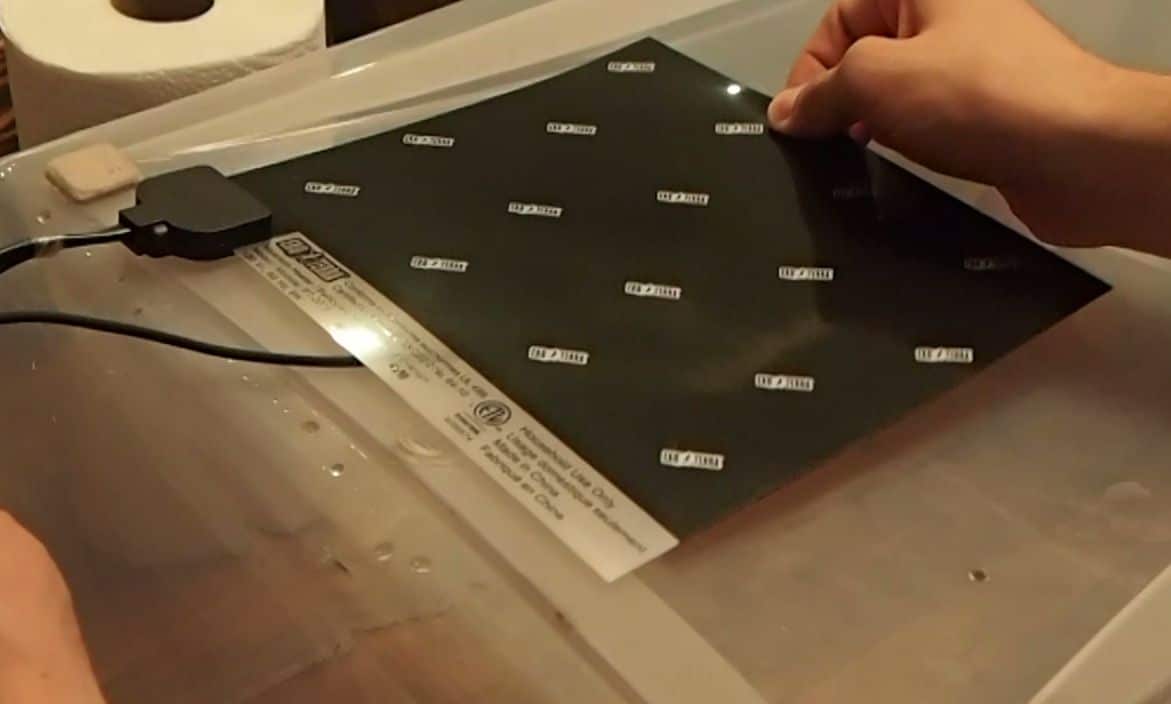
For the enclosure, I used a  Sterilite 110-Quart. This is definitely a little small for her — she is about 44″ and 650 g — but it will work well for the next 60- 90 days as a quarantine enclosure.

The tub has been placed in a quiet corner in a separate room.

Brazilian Rainbow Boa Setup
Tub: Brazilian Rainbow Boa Setup

Heating

Brazilian Rainbow boas do not require a ton of heat… actually prolonged temperatures over 85°F can be dangerous. That being the case I just went with a medium sized Exo Terra Heat Mat 8 WattThis mat is more than enough to do the job. Here are the temperature perimeters I aim for:

Cool Side Ambient: 72° – 74° F

Warm Side Ambient: 75° – 80°F

Hot Spot: 83° – 85°F

Heat Mat: Brazilian Rainbow Boa Setup

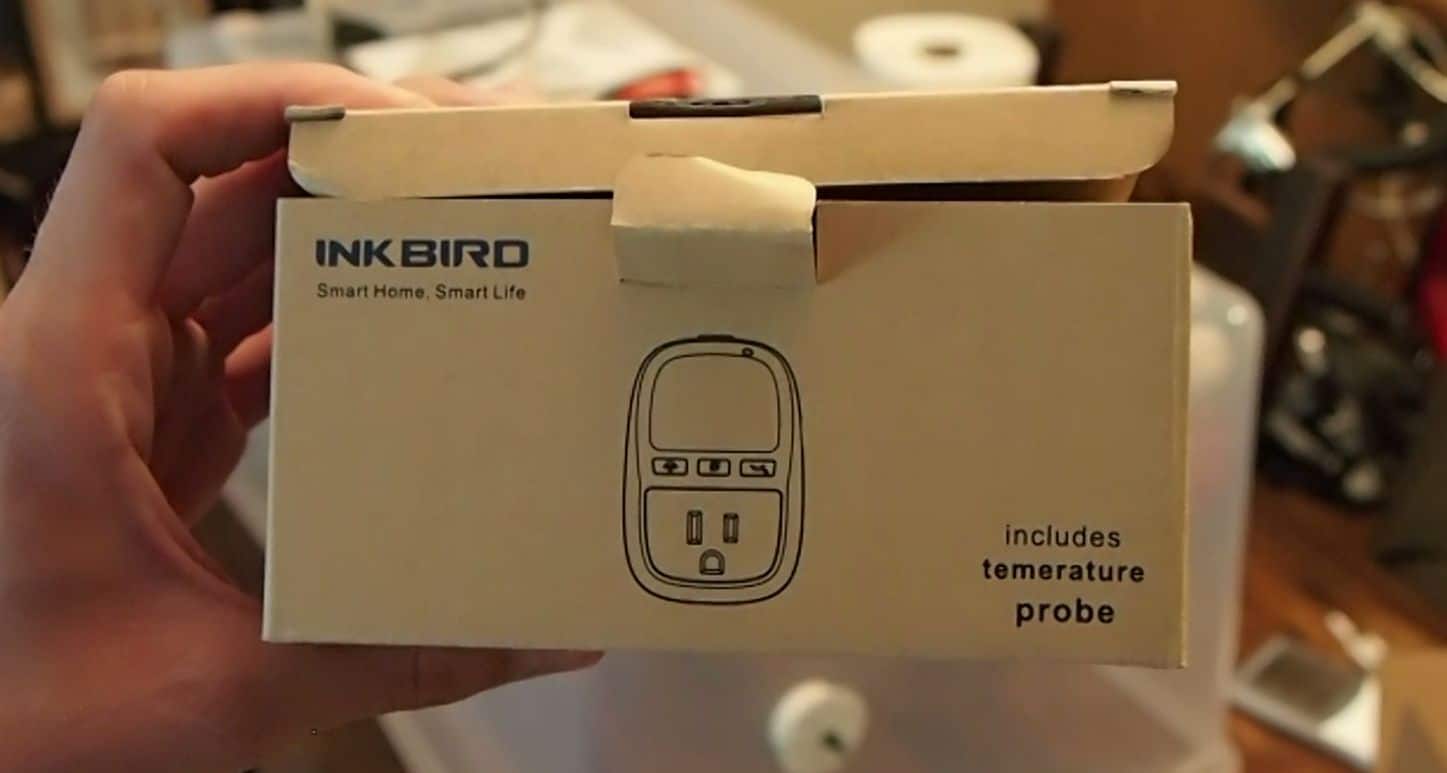
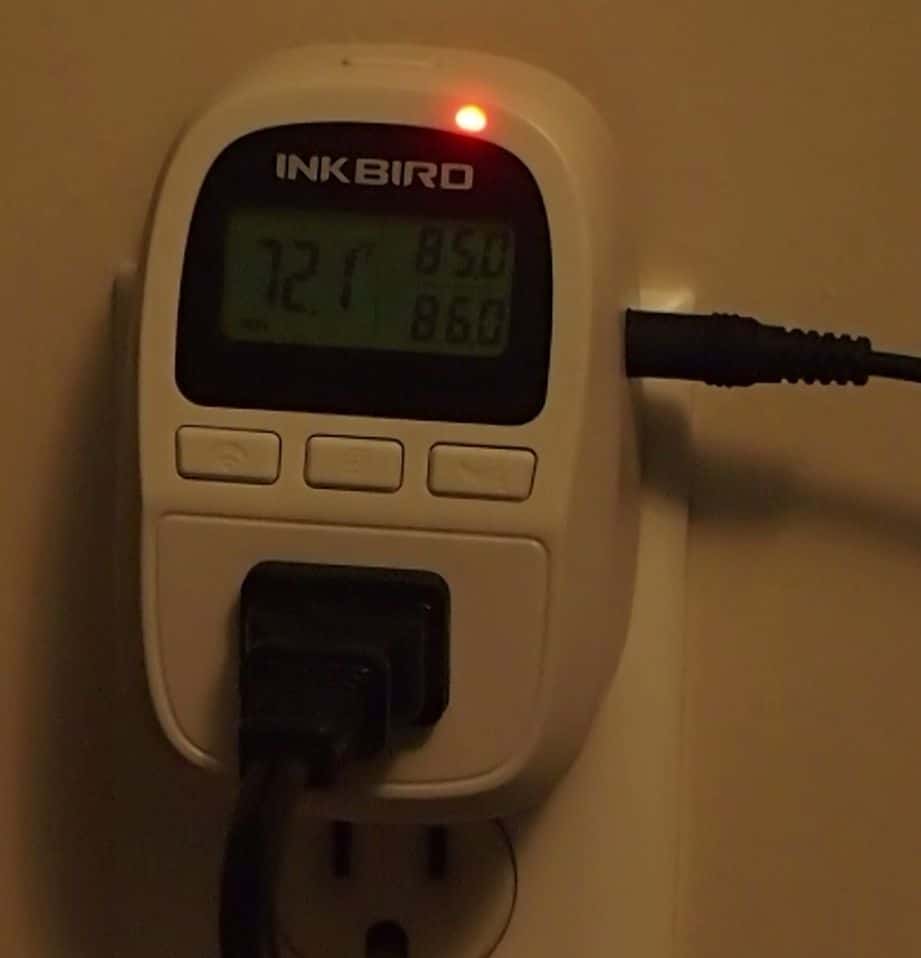
Of course, no heat mat should ever be installed without a thermostat to regulate it! I ordered Inkbird Temperature Controller off of Amazon.  It is a good little thermostat so far! Very easy to set up, it was inexpensive and the probe itself is long and detachable which is great!

My only regret is I just noticed they make a slightly more expensive model that is capable of doing Day/Night temperatures!  Dang I wish I had noticed that before. Next time that will be the one I order!

InkBird Thermostat: Brazilian Rainbow Boa Setup

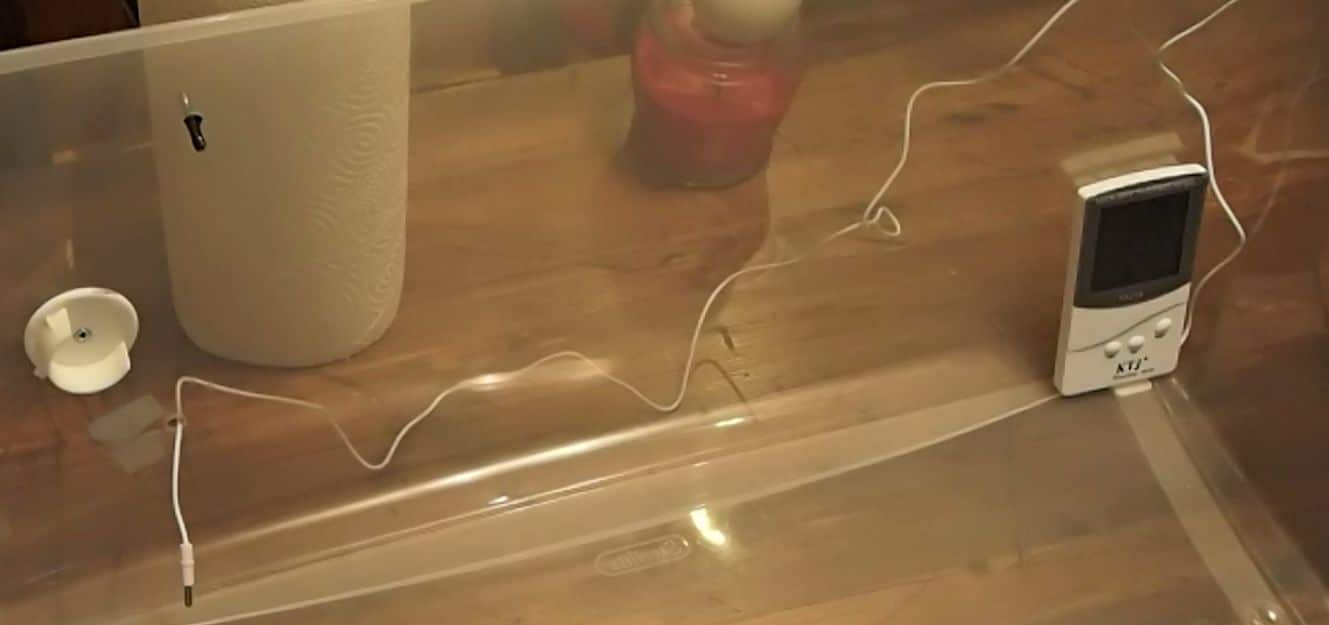
Here is how I set up the heat mat and thermostat probe:

  1. Stick the thermostat probe to the heat mat with foil tape.
  2. Stick the heat mat to the bottom of the tub (the probe is between the mat and the bottom of the tub)

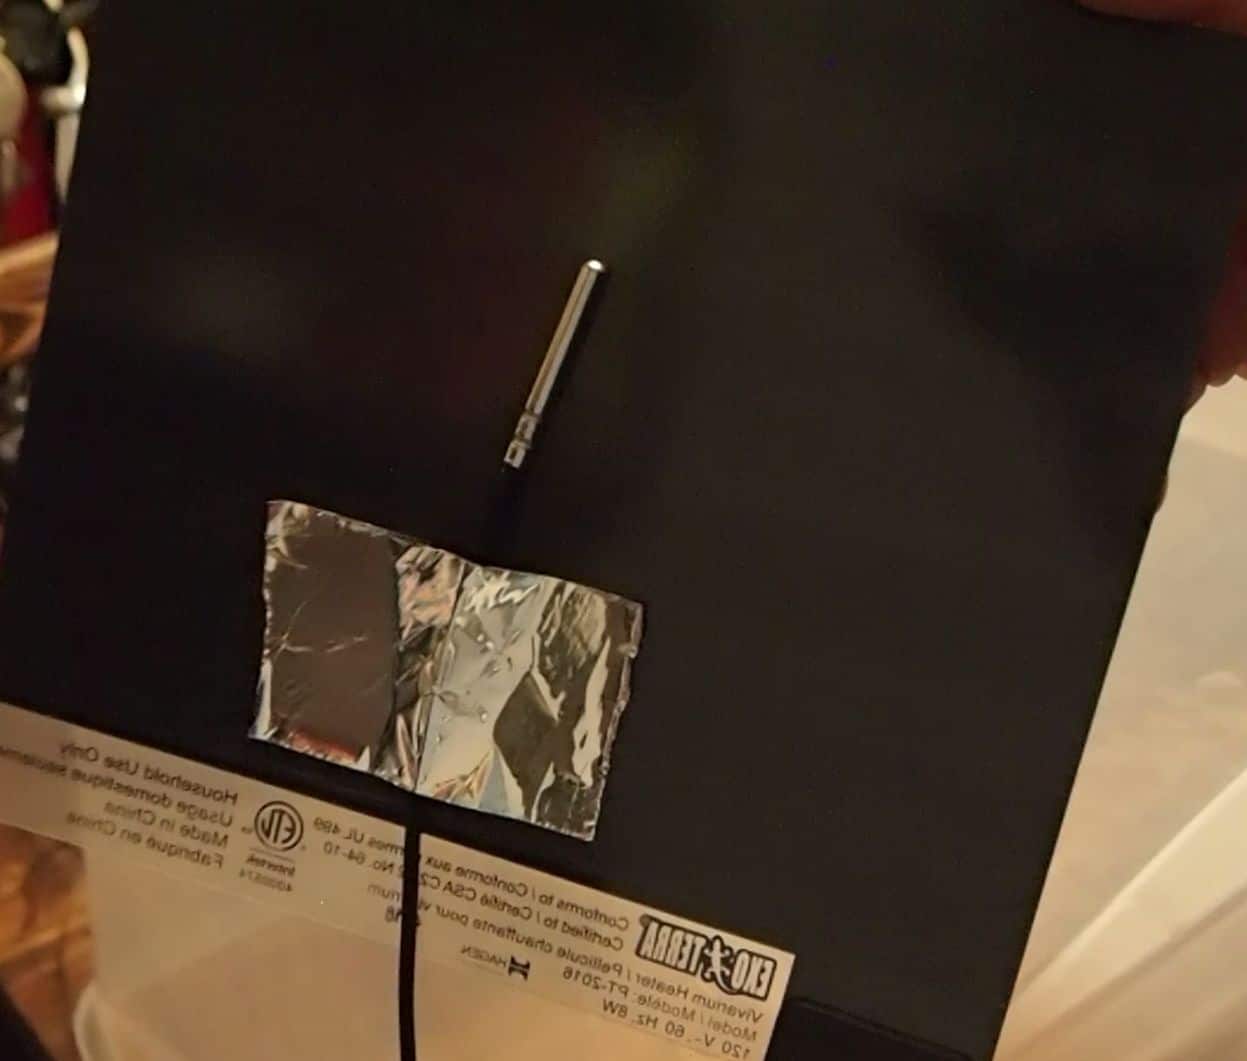
Normally I would secure the heat mat to the tub with foil tape, but since this is only a temporary Brazilian rainbow boa setup I didn’t bother.
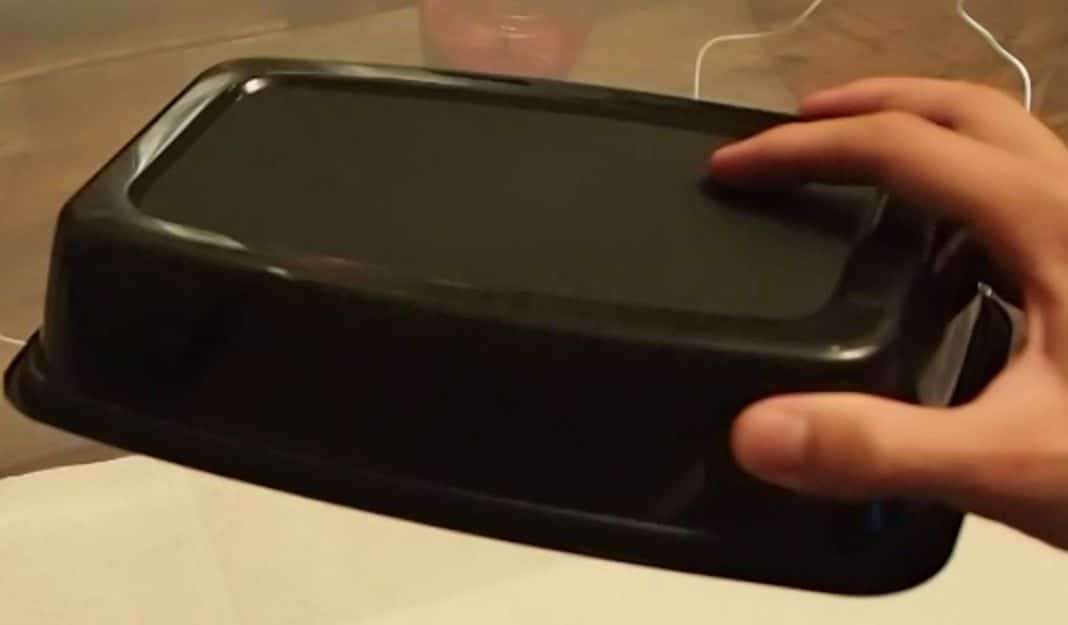


DIY Snake Hide

Here is a quick DIY snake hide for ya! This is a take home food container from Boston Pizza… not sure if you have that restaurant where you live. Anyway, we have a bunch of these laying around and I decided to turn this on into a hide.

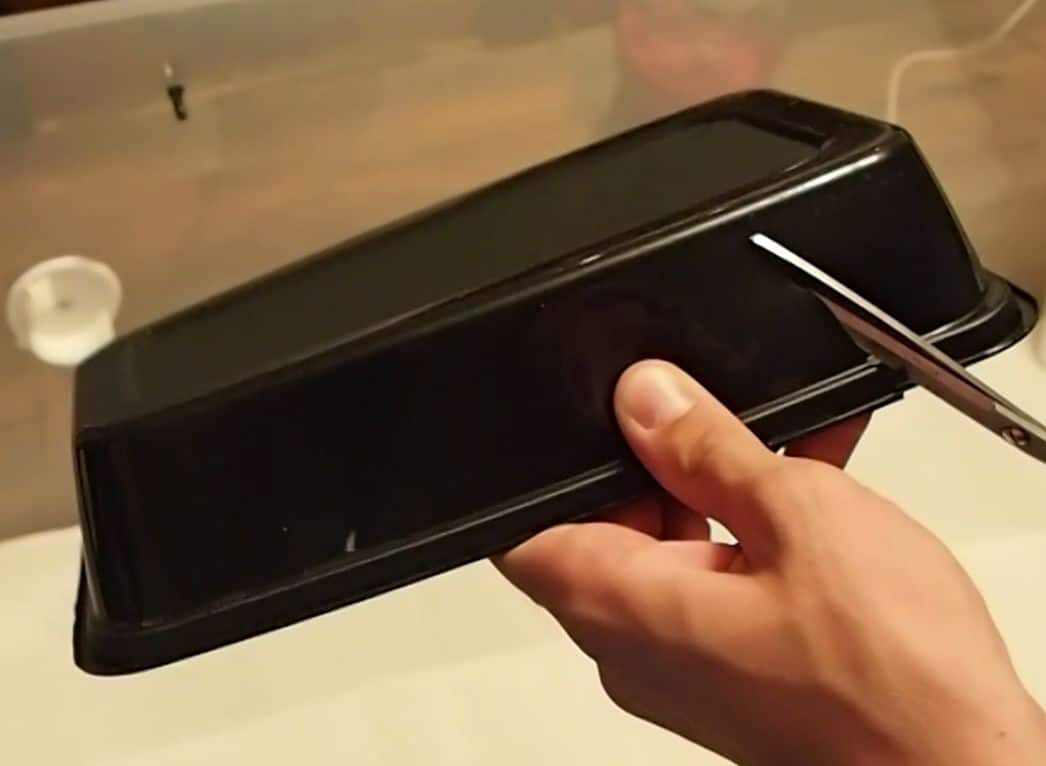
Here are the intricate, complicated steps:

  1. Use pair of scissors and cut out a door
  2. Use sand paper to smooth the edges
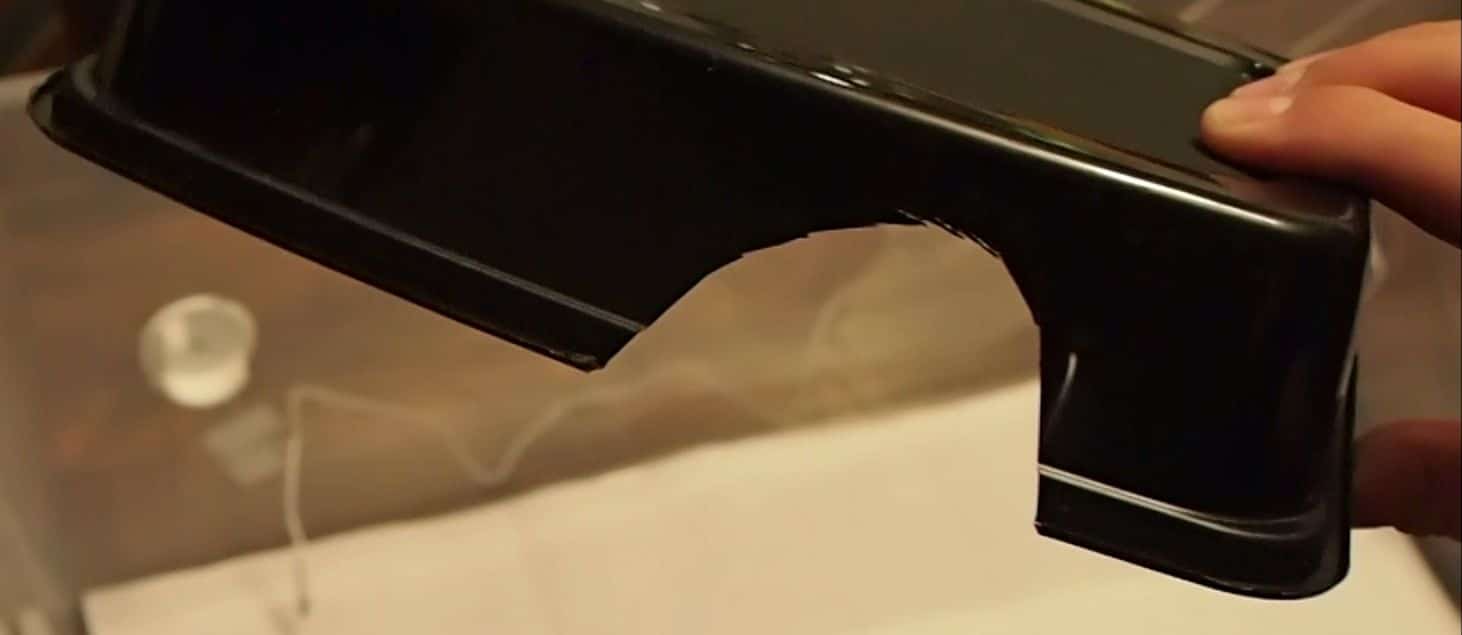
  3. Done…

Ta Da!

Thermometer

For a thermometer I ordered this: Indoor Outdoor Thermometer HygrometerI put the actual device on the cool side of the enclosure, the strung the probe up through the lid, around the back and through a small hole I drill through backside. The device is very basic but seems to be accurate for both the temperature and humidity.

Substrate 

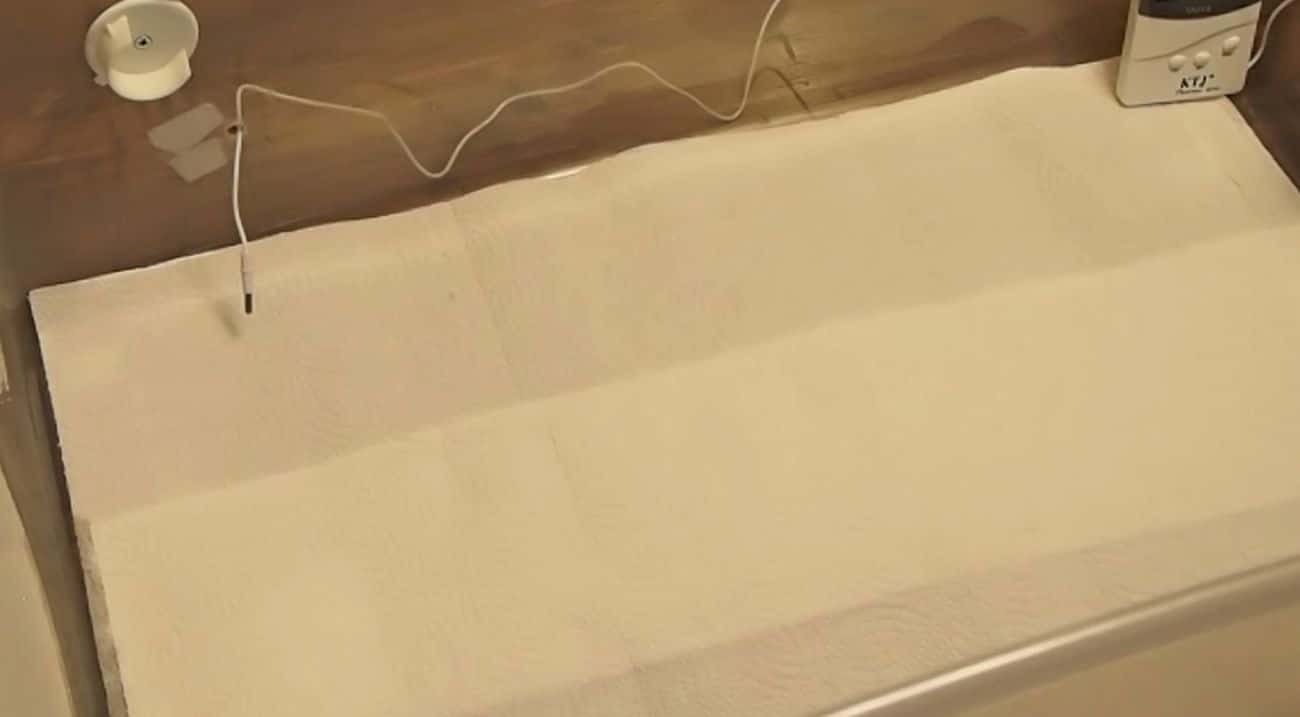
Since this is a quarantine tub I have decided to use paper towel as a substrate. Although I hate the look of paper towel as well as the mess it makes when the snake eliminates waste (aspen and/or coco husk tend to absorb more urates and reduce smell), it is much easier to monitor the health of the animal. Mites are much easier to spot and you can inspect their waste much easier.

I treat quarantine tubs the same way I would treat a “hospital tub,” i.e. I err on the side of making things more clinical than visually appealing.

Humidity 

If you know anything about Brazilian Rainbow boas you know they need a high level of humidity. These tubs easily hold humidity but a large water dish is necessary to get there.

With a sub-adult to adult rainbow boa you want the humidity to be above 75%, keeping in mind that as long as the substrate isn’t wet there is no such thing as “too humid” for them.

I haven’t had to mist or spray the tub at all and the humidity has balanced somewhere between 85-95%, luckily without producing any condensation.

Basic Setup: Brazilian Rainbow Boa Setup


Decor

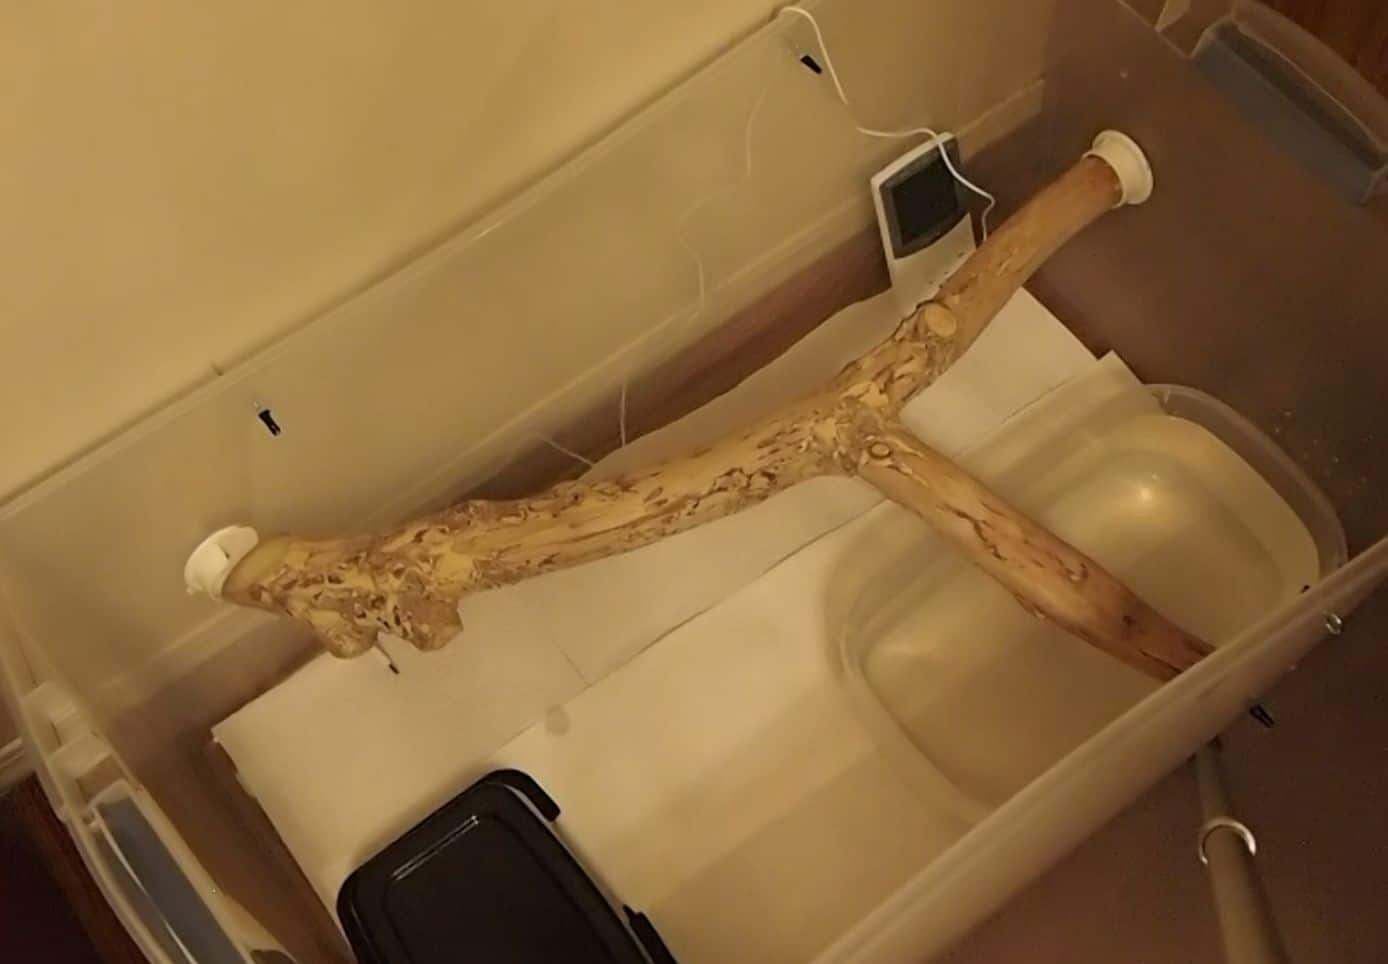
Again, I didn’t plan on adding much decor to this tub. I did however add a branch to climb on. I purchased Closet Pole Sockets from Home Depot to suspend the branch in the air. Brazilian Rainbow boas aren’t avid climbers but they will climb from time to time. I also added a second hide on the cold side, I just bought it the day after I took the photo below.

Brazilian Rainbow Boa Setup

Setting the Thermostat

Now that the Brazilian Rainbow boa setup was complete, I was able to set the thermostat and wait to see if my temperature and humidity perimeters fell in line.

The top temperature is when the heat mat turns on and teh bottom temperature is when the mat turns off.

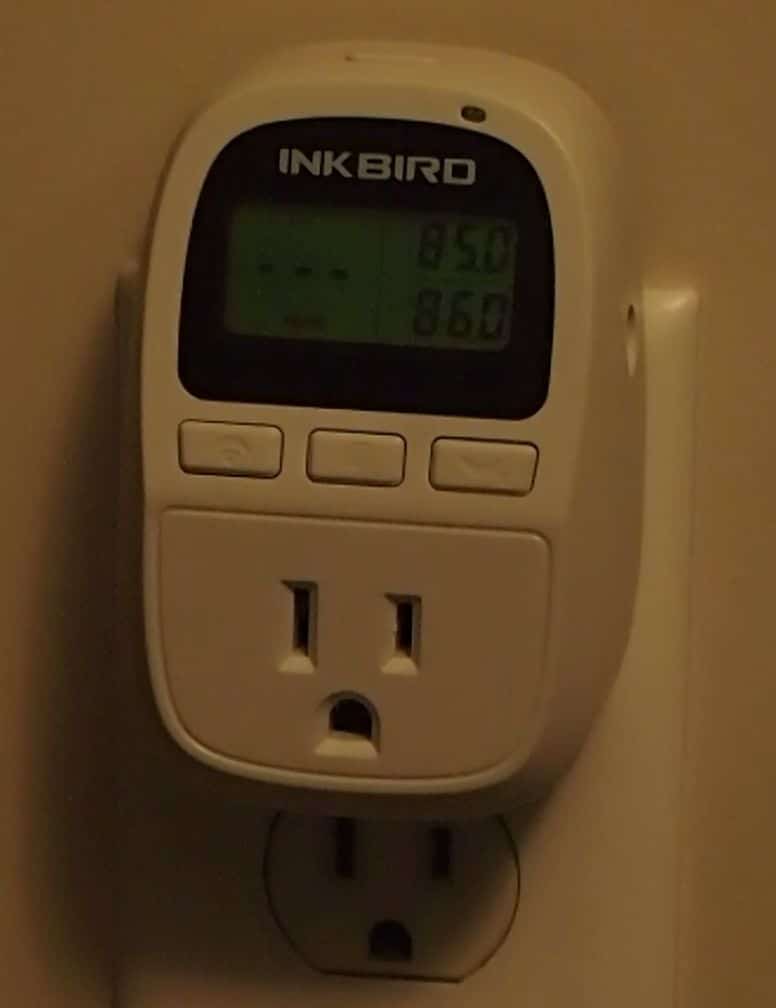
I simply, set the temperatures, plugged in the heat mat and the probe and that’s it! The red LED comes on when the heat mat is on and the temperature on the left hand side of the screen is the current temperature reading.

A few days later I picked up the new snake! So far she seems to be in great health. After letting her settle in for a week, I have been handling her every couple days for 3-5 minutes at a time, she has been very relaxed.

Again, this is an appropriate Brazilian Rainbow boa setup for a smaller animal ( I would say up to 3.5′ and under) or in this case is ideal for a quarantine tub for the next 2 months or so.

I will be doing another DIY snake cage build for this animal so make sure you subscribe on YouTube so you don’t miss it!

Brazilian Rainbow Boa Setup


HOW TO: Convert Cabinet into Reptile Enclosure

This article is a step by step guide to how I used an old china cabinet to create by own DIY chameleon cage. If you are the type of person who likes to listen rather than read you can watch the video below:

DIY Chameleon Cage:


SCROLL TO THE BOTTOM TO FEW THE FINISHED PROJECT!

STEP ONE: FIND A PIECE OF CHEAP FURNITURE!

It is always I good idea to have a particular animal in mind when designing and building an vivarium. Or at least a “class” of animal. I converted this china cabinet initially as a diy chameleon cage project but since it was made with an arboreal species in mind, it also worked for my giant day gecko for a while as well.

So, if you have a species or a “class” of species (arboreal, terrestrial, tropical, arid, etc.), hit the classifieds and start looking for a good piece of furniture! Moving sales are great, normally you can get things fairly cheap.

This exact cabinet below I have seen for sale as high as $350 on the classifieds (although who knows what they actually got for it), I bought mine for $50 because the seller “just wanted it out of the house!”… they also may not have been fully aware of the actual value of the unit. Worked for me. Anyway, of course I went with this unit because of its height (3.5′), it was also about 2 feet wide and 2 feet deep (at its deepest point, it is a corner cabinet).


Corner China Cabinet, $50.00
DIY chameleon cage: Corner China Cabinet, $50.00

STEP 2: COME UP WITH A PLAN

Once you have your piece of furniture at home, spend some time planning. Some mistakes are forgiving but some are not, especially if you are working with a one-of-a-kind piece of furniture. This vivarium was being converted to a diy chameleon cage, therefore I needed it to:

  • Have good ventilation
  • Handle high humidity and mositure
  • Have proper lighting
  • Handle live plants

So, my plan was:

  1. Remove the top and side panels, replace with screen
  2. Seal any wood, as well as any seams
  3. Build some kind of “tray” in the bottom to hold soil and plants

Seems simple enough, let’s go!


STEP THREE: VENTILATION

The first thing I did was remove the side panels of glass. Chameleons require ample ventilation so adding more screen was necessary.

Removed side glass panels
DIY chameleon cage: Removed side glass panels

The top also needed to be removed. This accomplished two things:

  1. Increased ventilation
  2. Provided an area for a lighting system to function properly

As you can see, the top was solid wood. I used a Reciprocating Saw to cut it our completely.

Top of the cabinet
Top of the cabinet
Top of the cabinet removed
DIY chameleon cage: Top of the cabinet removed

I went to Home Depot and bought metal mesh screen and screen frame. I used the “tabs” that held the glass panel in to secure the screen frame to the cabinet.

On one side of the cabinet I included a “hand door,” pictured below. Hand doors are handy (sorry)… but they are! Especially if the main door is very large like the one on this cabinet. It is very convenient to be able to open a small door for feeding, misting, etc., rather than opening the entire front of the vivarium (especially if you are keeping flighty animals).

I don’t have a great picture of it but I also stapled screen to the top as well.

Screens installed to replace glass panels


STEP FOUR: SEAL!

Next on the agenda was sealing the china cabinet up to protect it from moisture damage.  First I used GE 100% Silicone I (make sure you use GE Silicone I, not II. Scroll to step 4 HERE to read why), to seal any of the seams in the cabinet.

Silicon filled seams

It was also necessary to seal any exposed wood. Keep in mind, the two major walls of the cabinet are actually mirror. This was great because it really reduced the amount of wood in the vivarium to pretty much just the door frames.

I used MINWAX Polycrylic to do this. It is water based and paints on very easy. Plus, once dry it is perfectly safe for your animals!


STEP FIVE: PLANT TRAY

The second last piece of the “diy chameleon cage” puzzle was building a tray to allow the vivarium to hold soil and live plants. This was my favorite part of the build!

The china cabinet came with glass shelves. I used one of these glass shelves as the base of the tray. Then, remember the glass panels I removed at the beginning? Well I took that glass, cut it to size and used silicone to secured it to the base to form “walls’ for the tray. It worked perfectly!

I let it cure for 24 hours and the filled it with water to ensure their were no leaks. There weren’t!

I found the glass edges to be a little sharp so I cover them with pipe insulation.

Glass plant tray
Glass plant tray
Glass tray completed


STEP SIX: BACKGROUND AND SET UP- DIY CHAMELEON CAGE

The last thing left to do before planting the vivarium was covering the mirror’s. As I said above the two large back walls of the vivarium were mirrors. This was good news and bad news. The good news was mirror’s are obviously made of glass meaning water damage wouldn’t be an issue. The bad news was it needed to be covered because it looked weird.

I went to staples and bought Quartet Cork Roll. It was inexpensive and worked great. I just glued it to the mirror using the silicone and was all set. The cork provided a more natural look to the vivarium’s background and is durable enough to handle moisture.

Cork background
Cork background

Then it was time to add soil, plants and decor!

diy chameleon cage
diy chameleon cage- door open
diy chameleon cage
diy chameleon cage- door closed

To plant the vivarium, I used:

Before it was sold, I swapped out some of the plants shown below:

diy chameleon cage- replanted

 This was a really fun project to work on and fairly simple to do! Again, the project was intended for chameleons but I was able to keep my giant day gecko in it for a few months before I sold it.

I encourage you to go out, find a piece of furniture and do a diy project of your own! Always remember the animal’s safety is priority number one!

Material List:


Privacy Policy   |  Affiliate Disclaimer  |  Full Disclaimer  |  Terms of Service  |  Copyright text 2021 by Animals at Home